• Skip to primary navigation
  • Skip to main content
  • Skip to primary sidebar
Everyday Eileen
  • Home
  • Recipes
  • Lifestyle
  • About
    • Let's Go Shopping
      • Privacy Policy
  • Contact
  • Subscribe
menu icon
go to homepage
  • Home
  • Recipes
  • Lifestyle
  • About
    • Let's Go Shopping
      • Privacy Policy
  • Contact
  • Subscribe
    • Facebook
    • Instagram
    • Pinterest
    • TikTok
  • subscribe
    search icon
    Homepage link
    • Home
    • Recipes
    • Lifestyle
    • About
      • Let's Go Shopping
        • Privacy Policy
    • Contact
    • Subscribe
    • Facebook
    • Instagram
    • Pinterest
    • TikTok
  • ×
    Home

    Pumpkin Creme Brulee

    November 23, 2024 Leave a Comment

    A ramekin with pumpkin creme brulee.

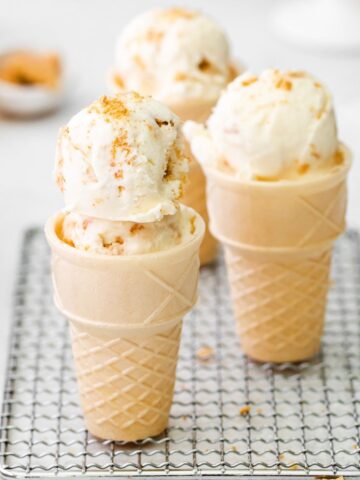
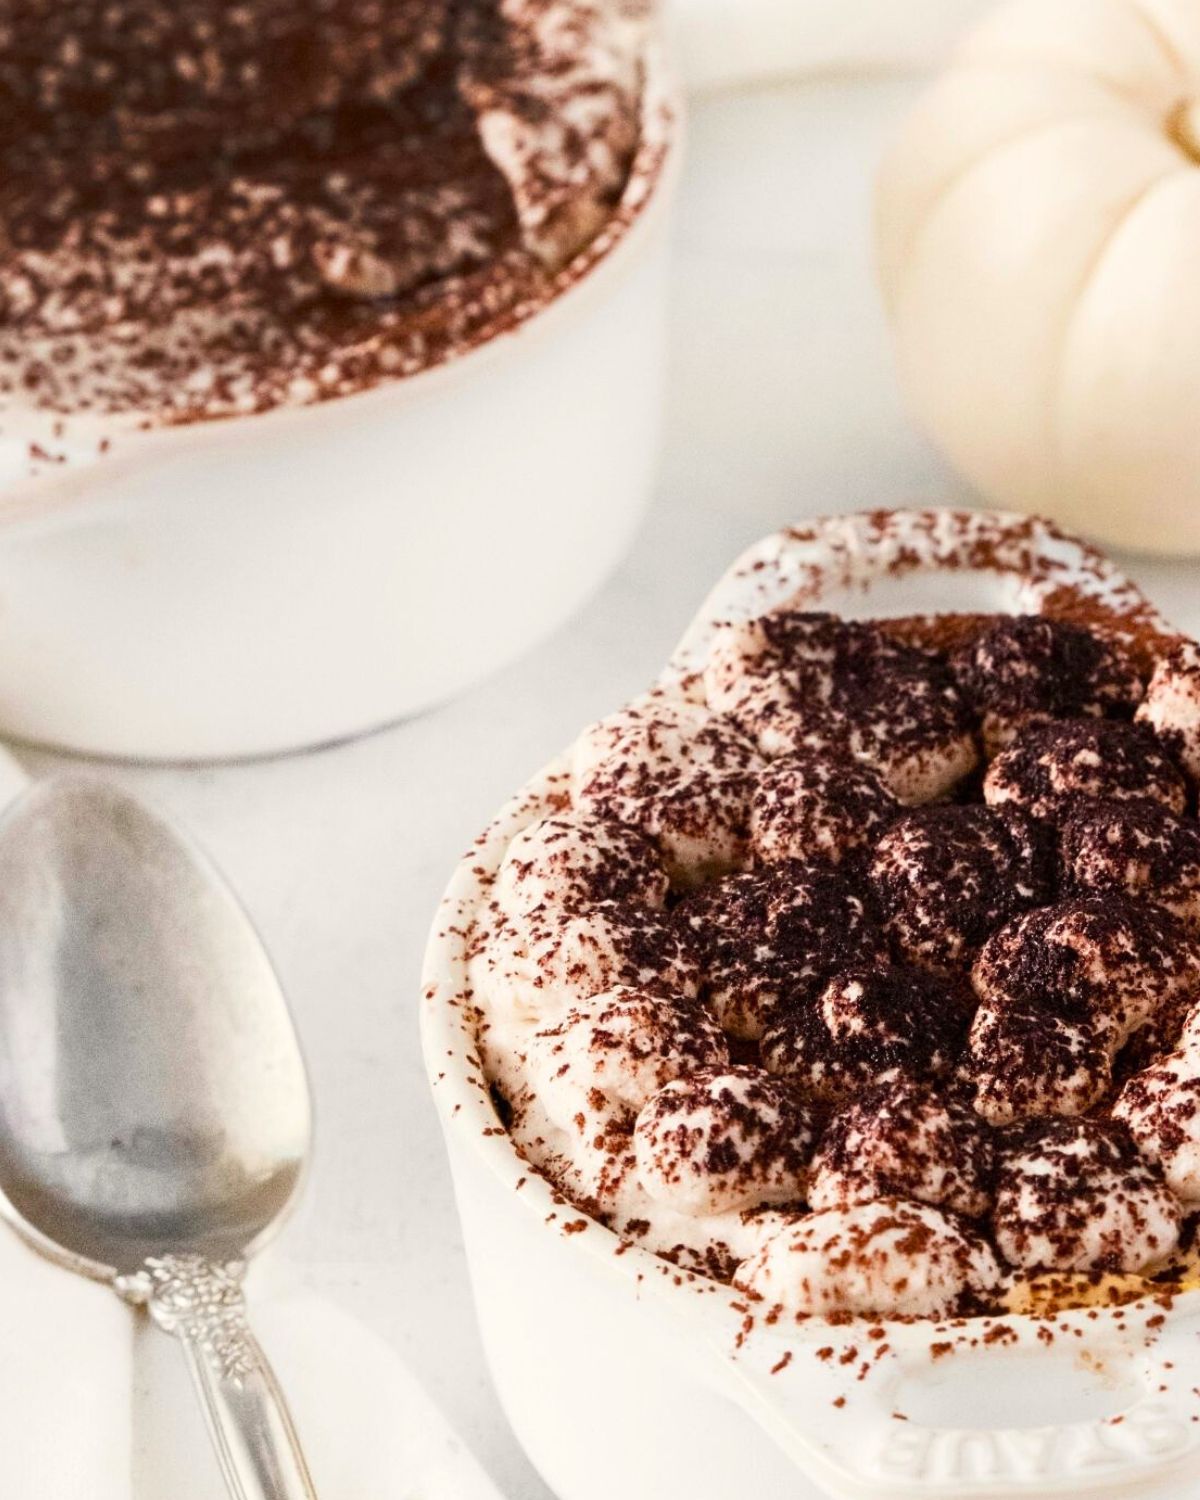
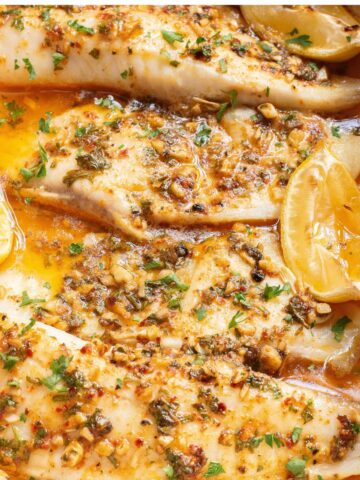
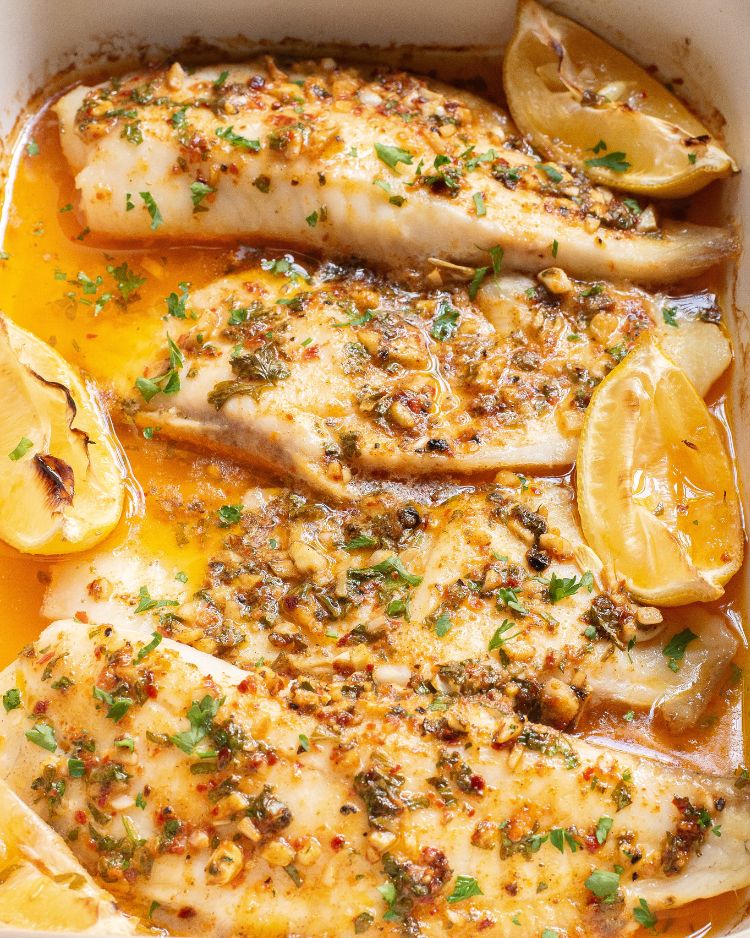
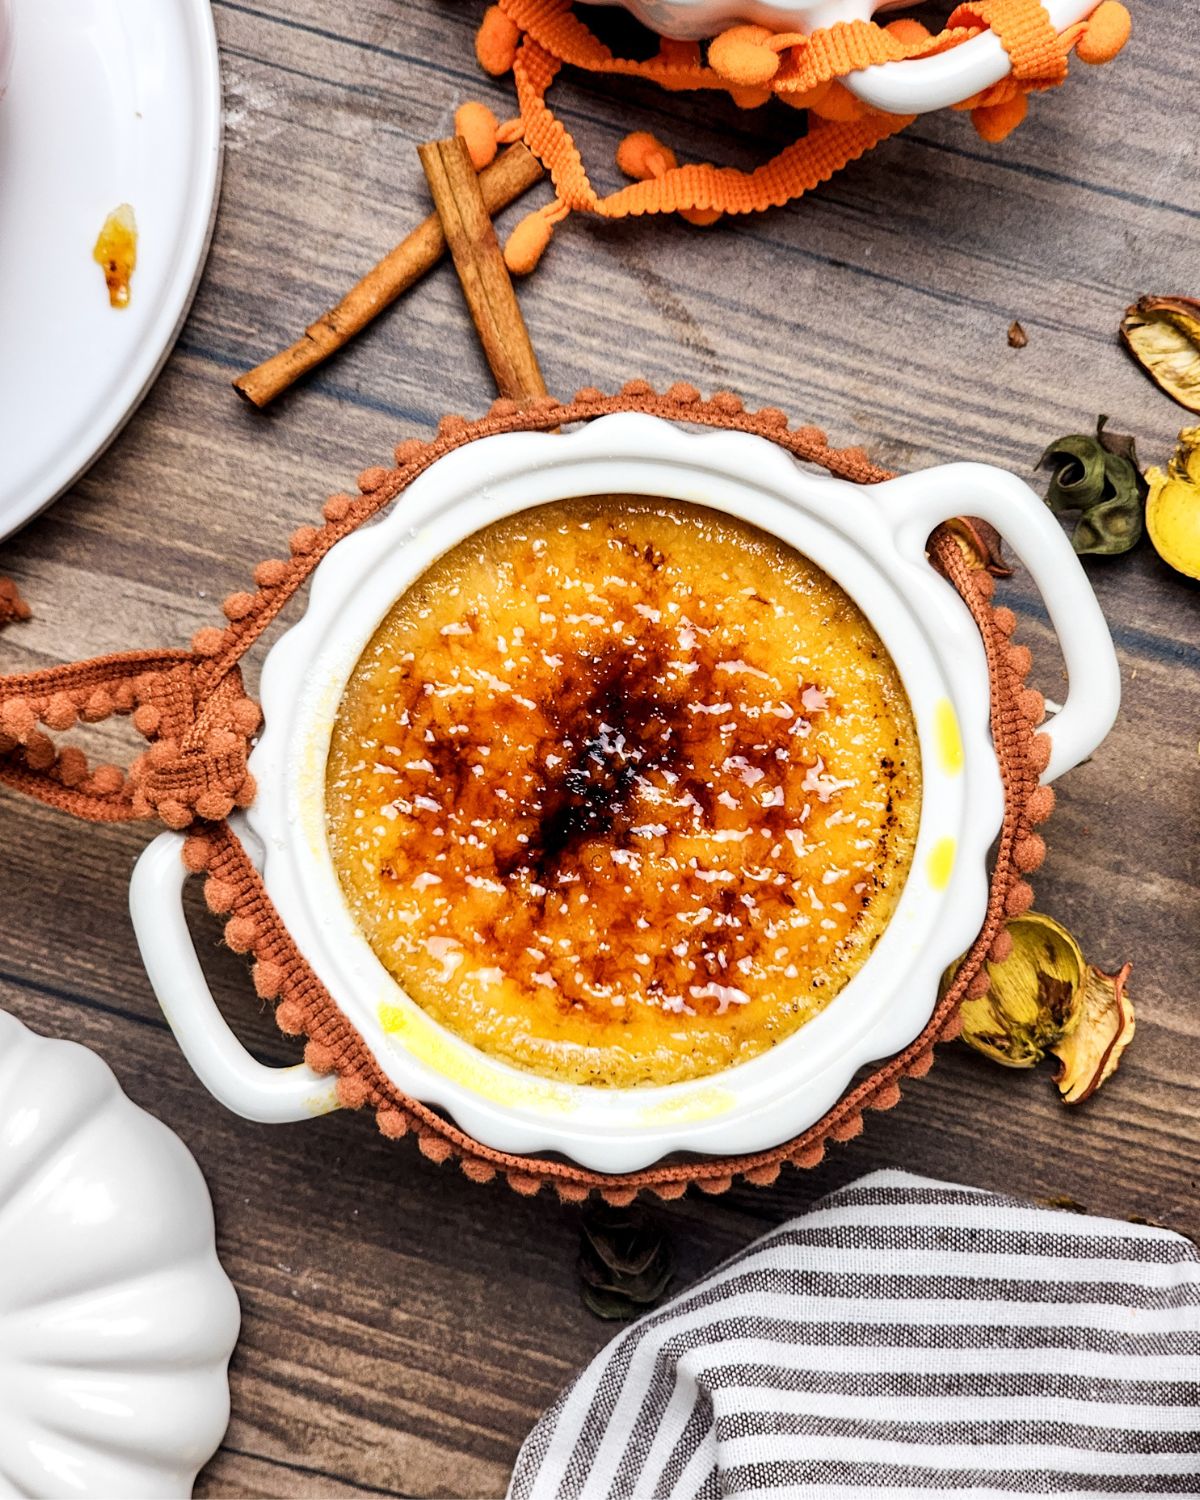
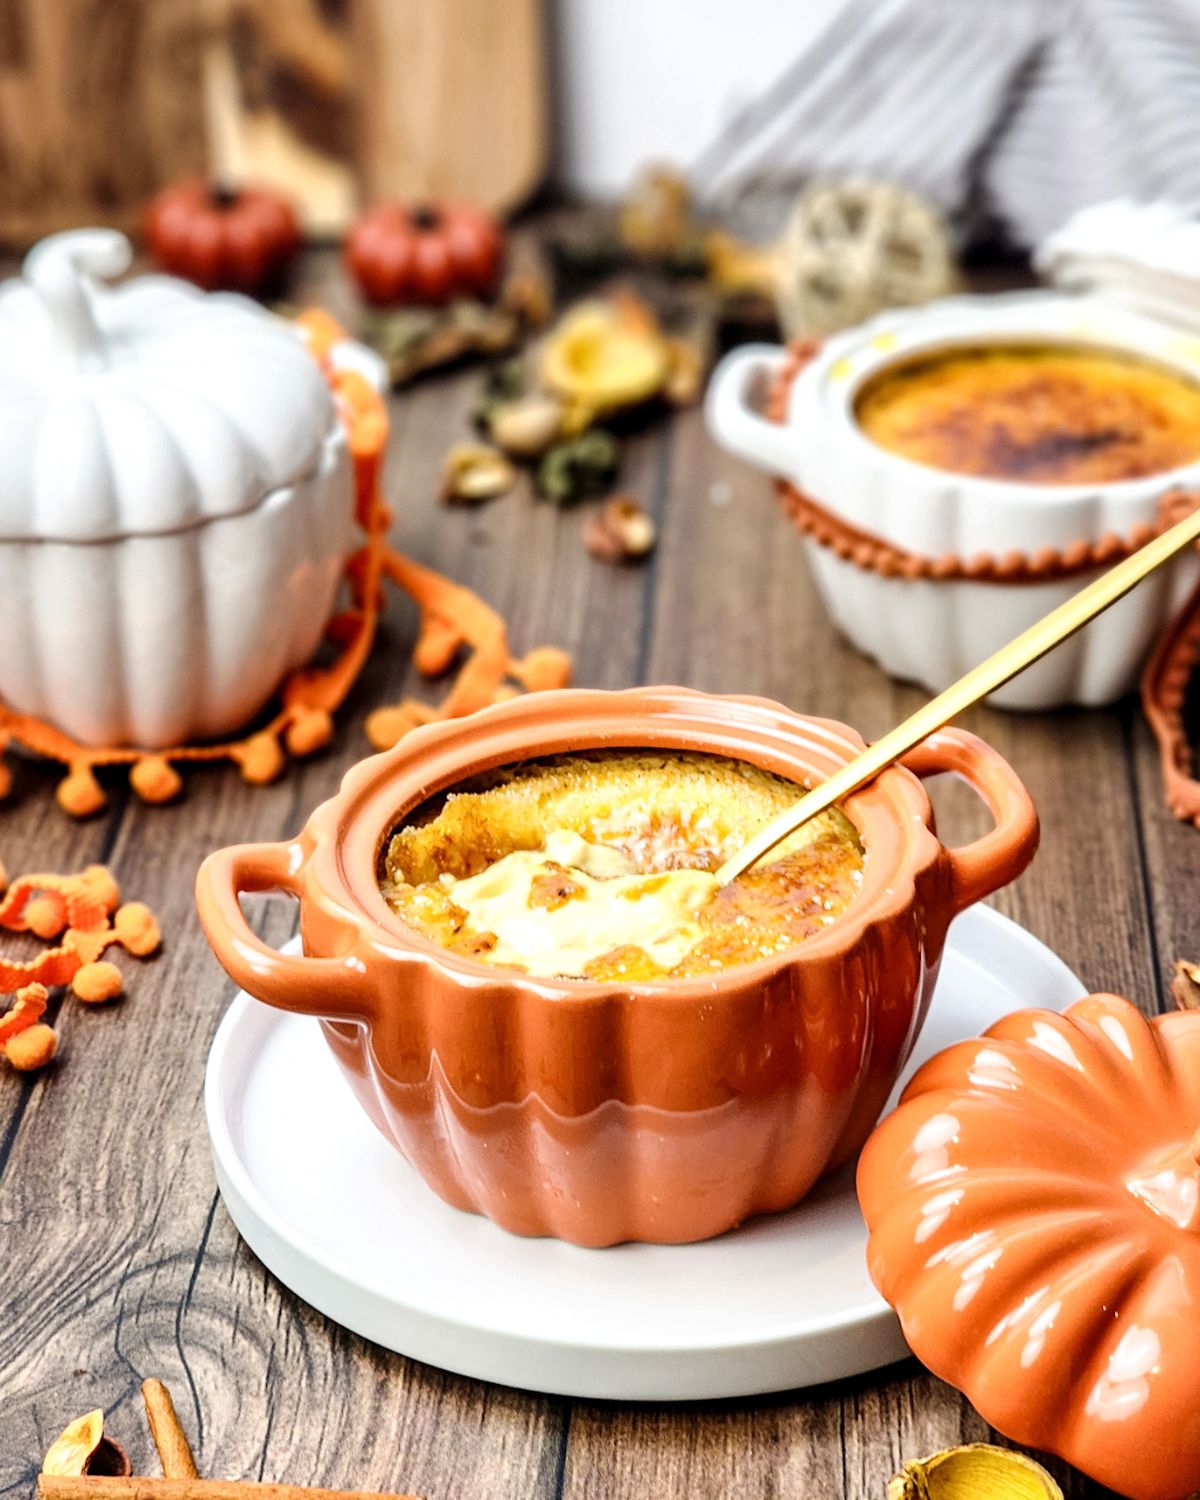
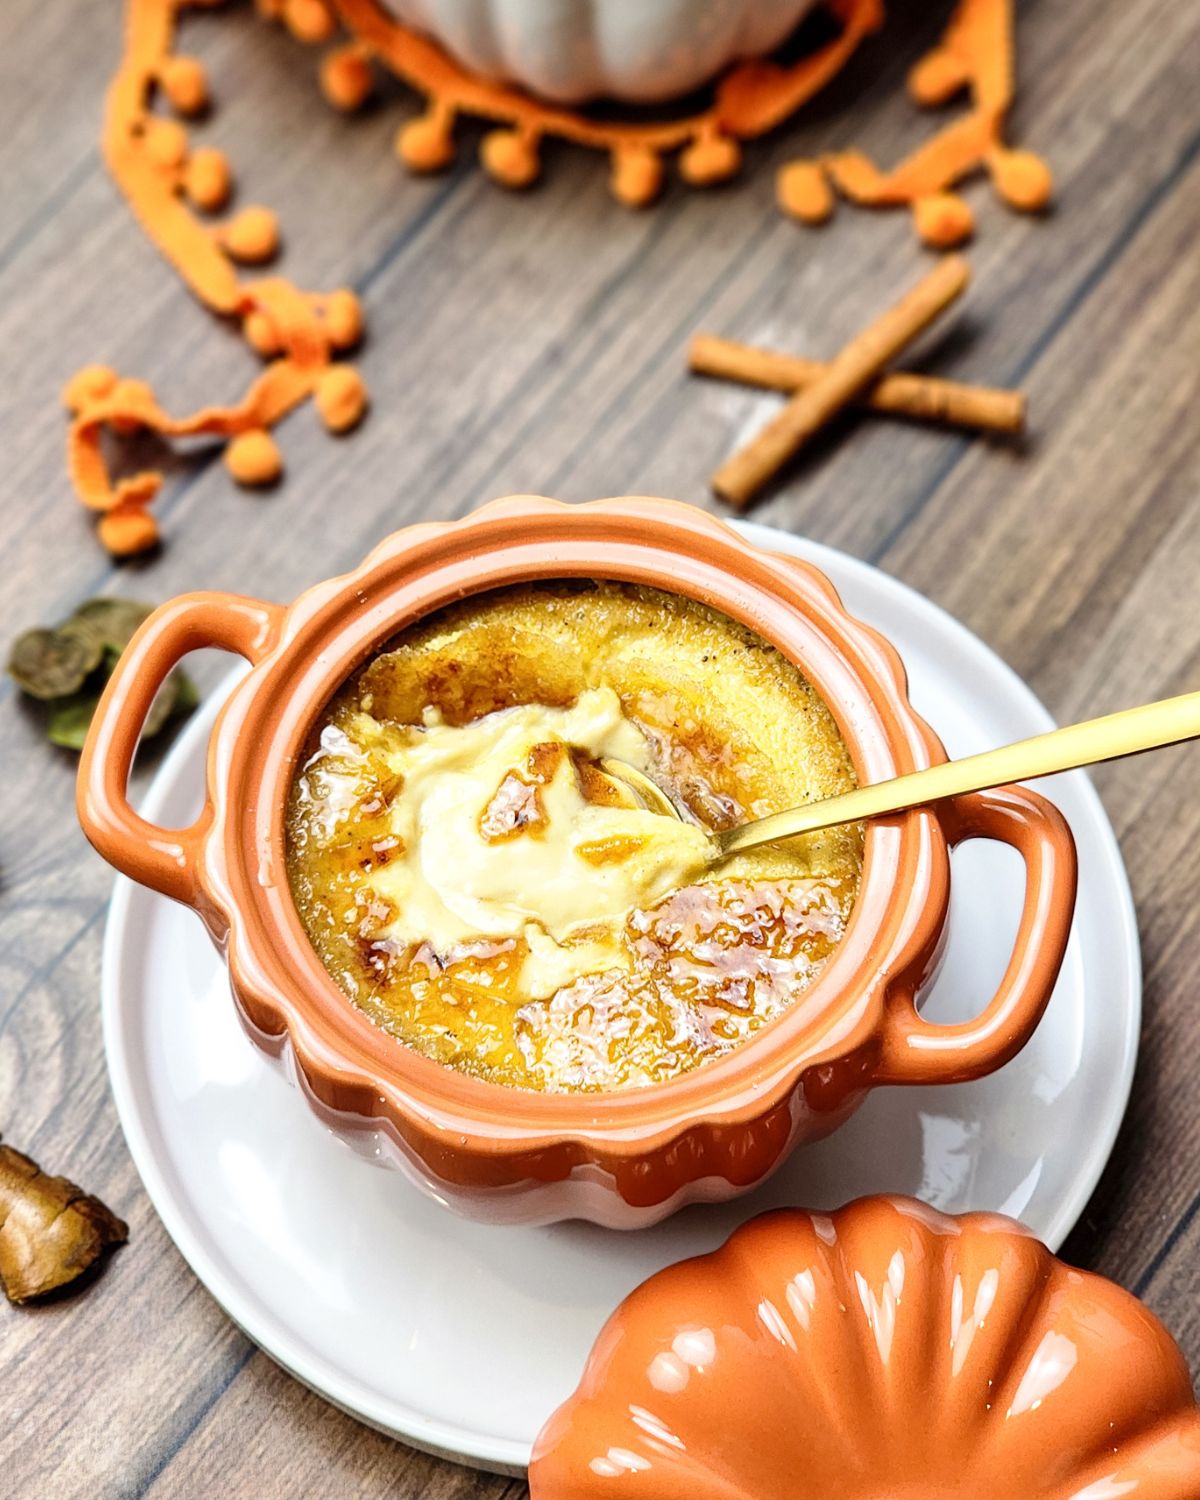
    This Pumpkin Creme Brulee is the perfect dessert for fall! Made with rich pumpkin puree, warm spices, and a creamy custard base, this sweet treat will have you craving more. Whether you're hosting a dinner party or simply looking for a sweet treat, this recipe is sure to become a new favorite.

    A white ramekin with pumpkin brulee in the bowl on a wooden plate.

    For specifics on the recipe use the table of contents to click on sections of the recipe.

    [feast_advanced_jump_to]

    Why you'll love this recipe

    • This recipe can be made ahead of time, and then you can serve it chilled or at room temperature.
    • It's also a great dessert for any occasion, from gatherings to dinner parties it will always be a crowd favorite. 
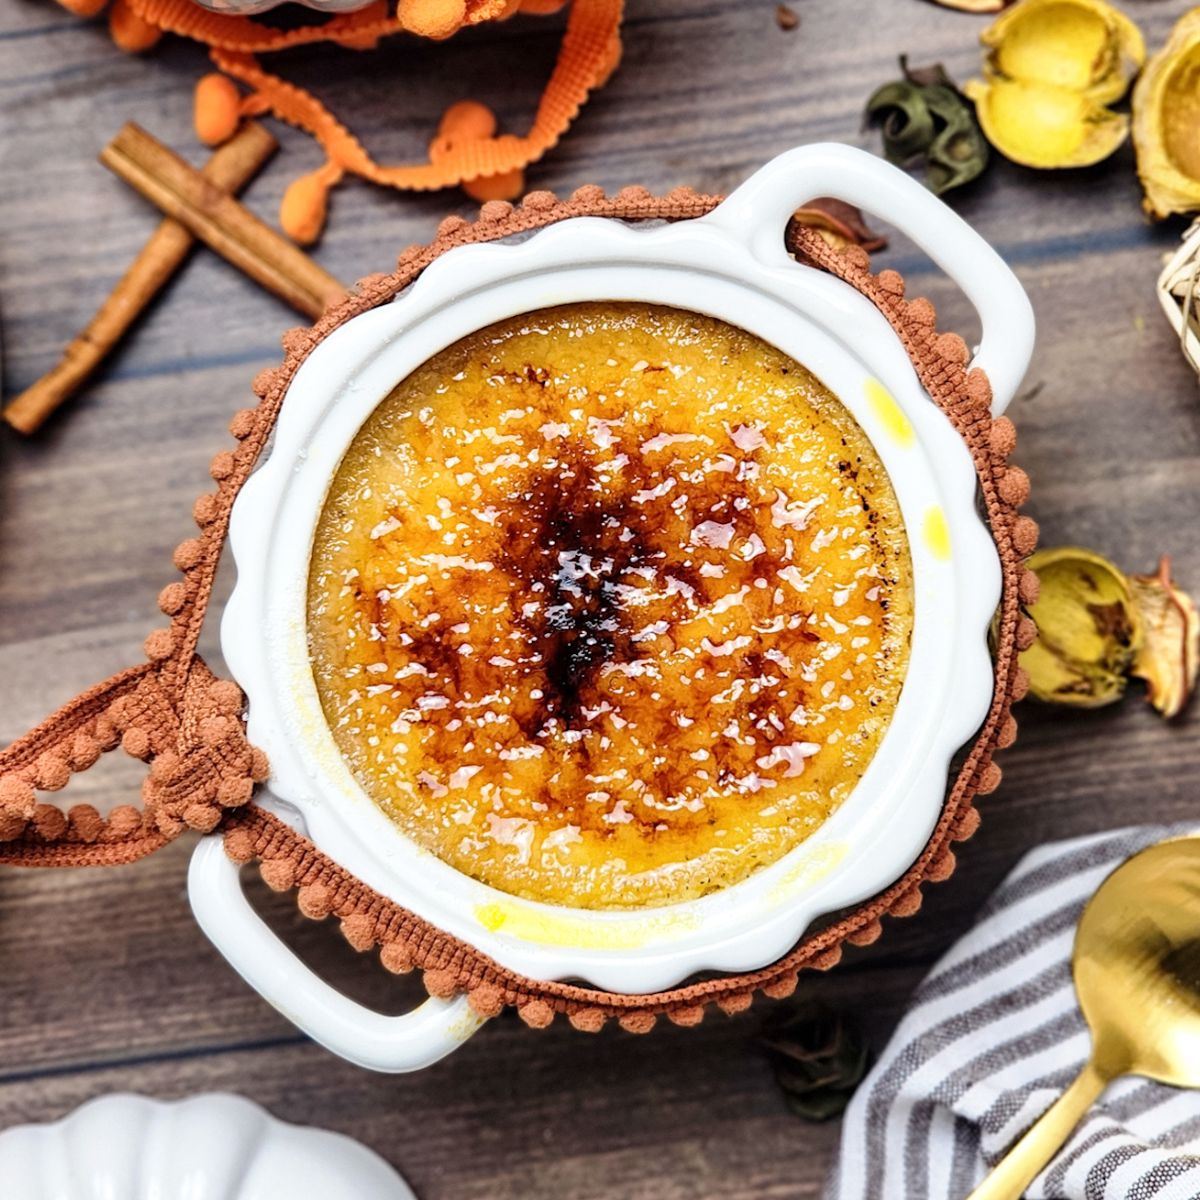
    • The brunt sugar on the top adds such a rich flavor and crispy texture to your dessert. 
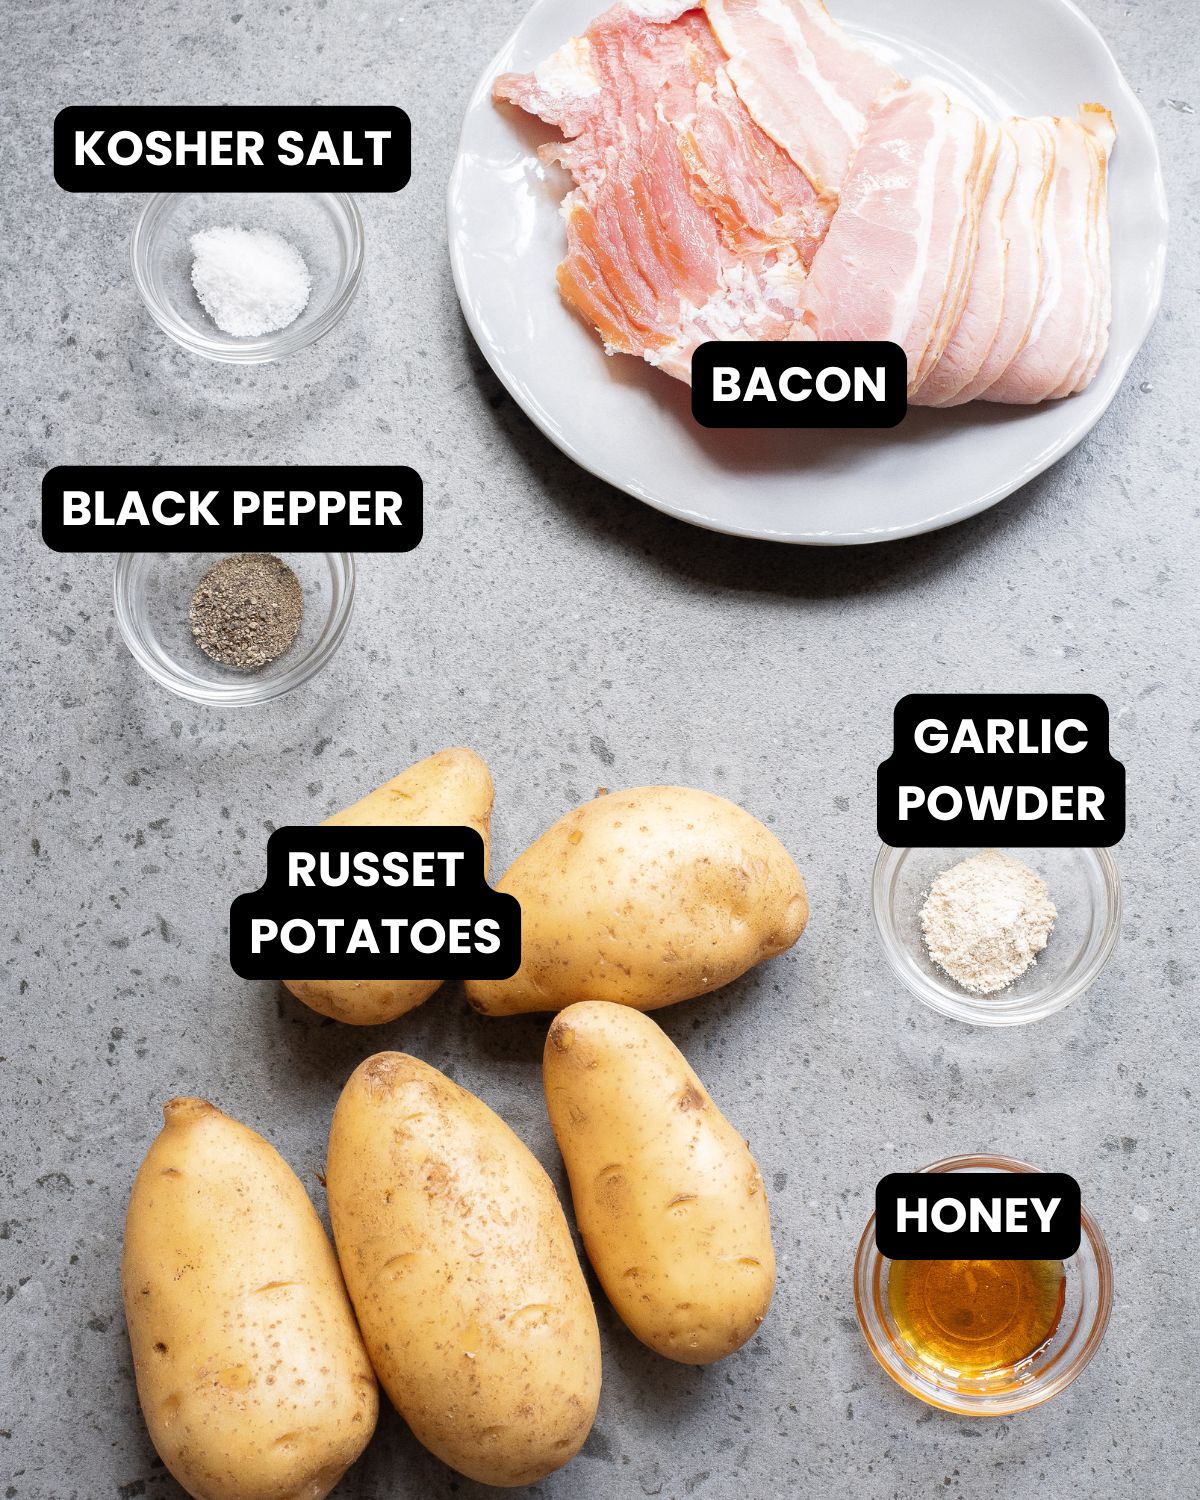
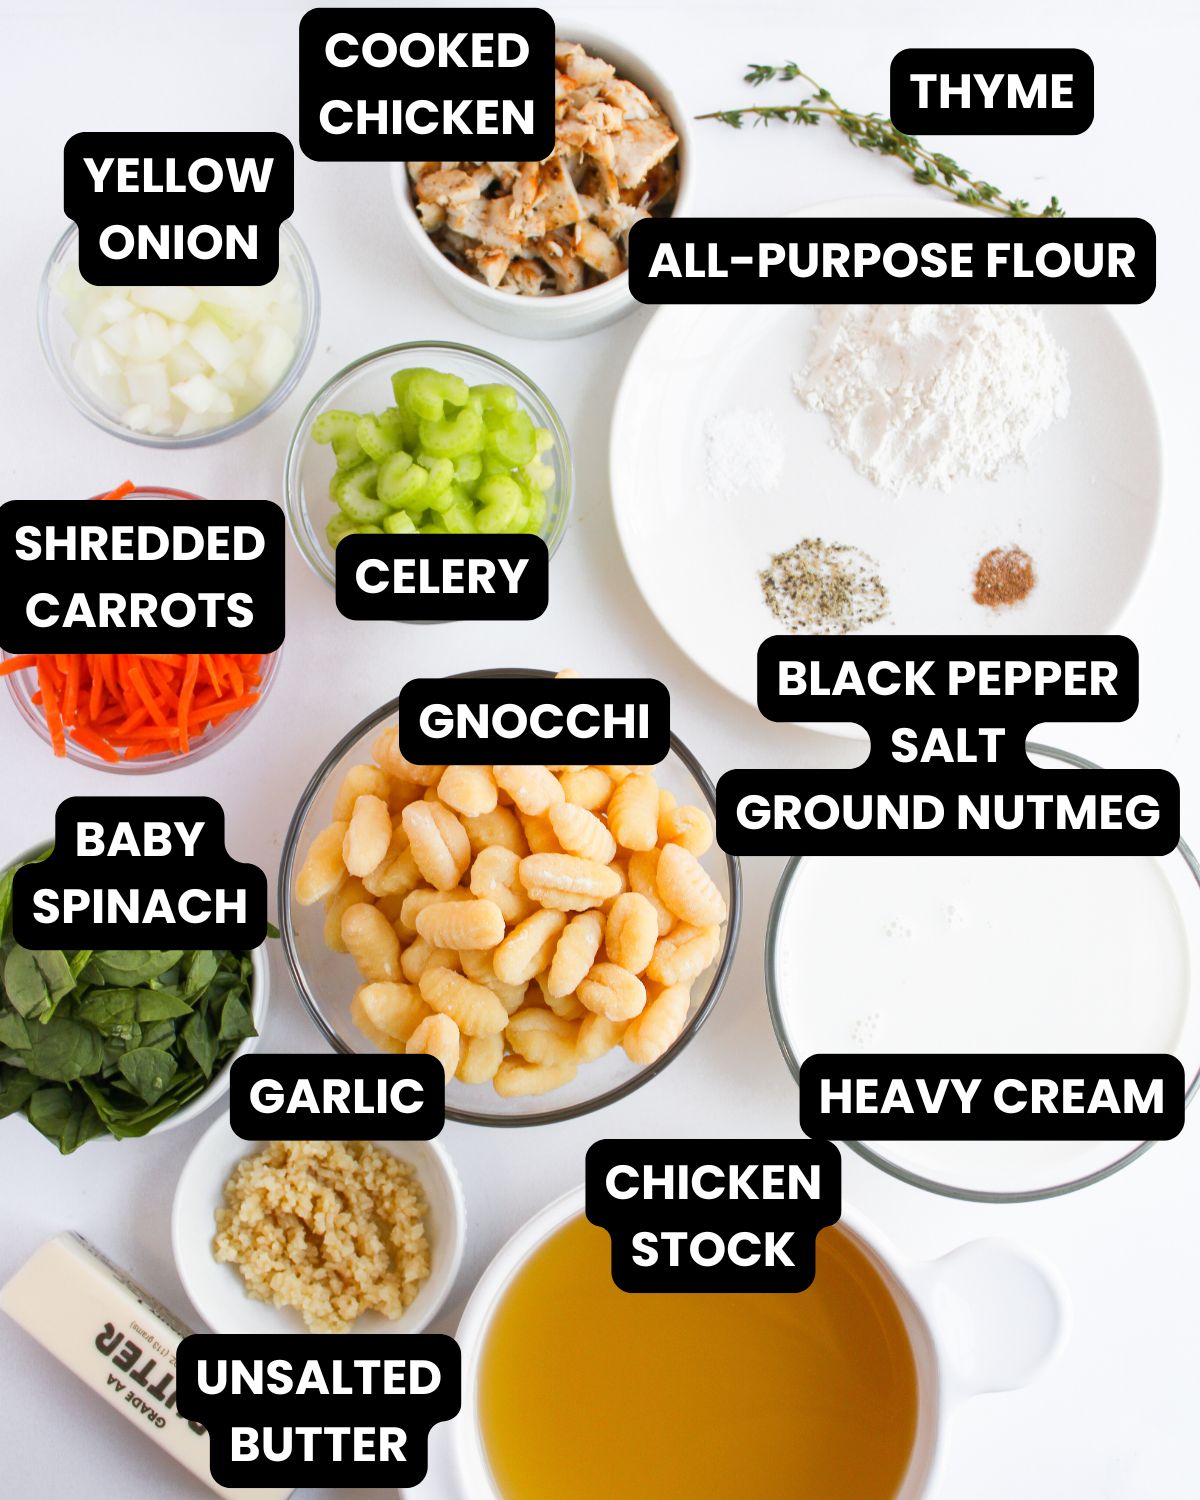
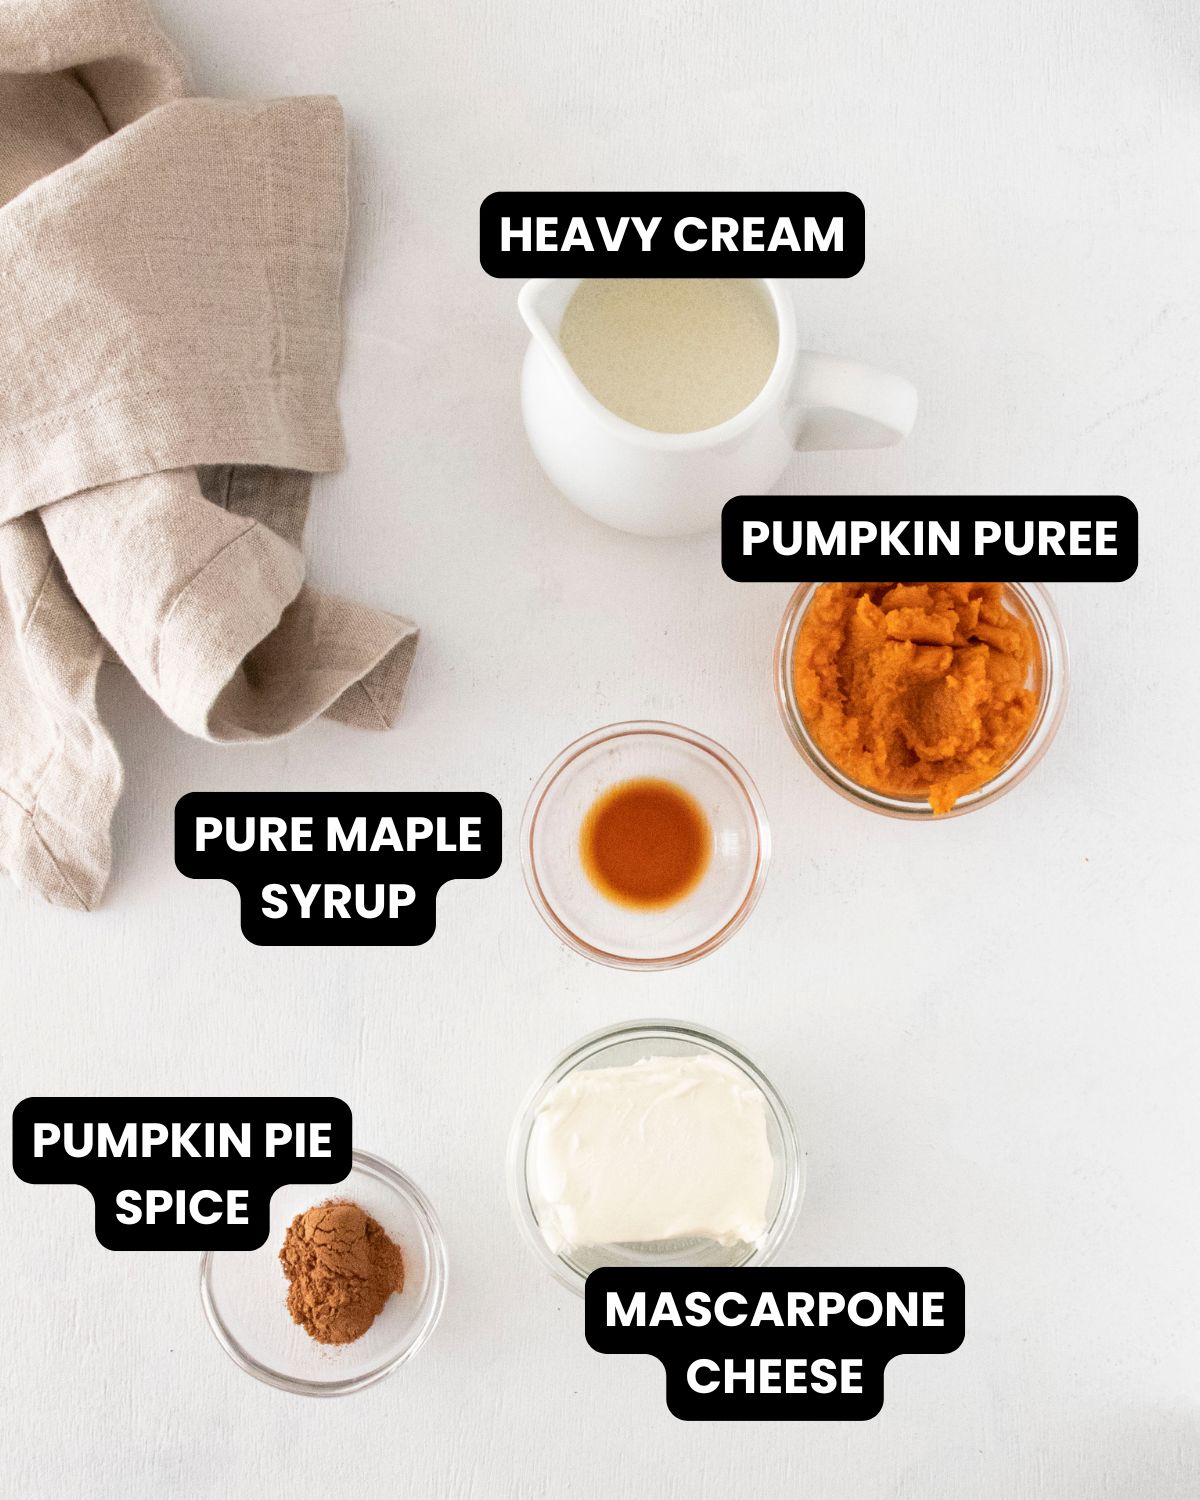
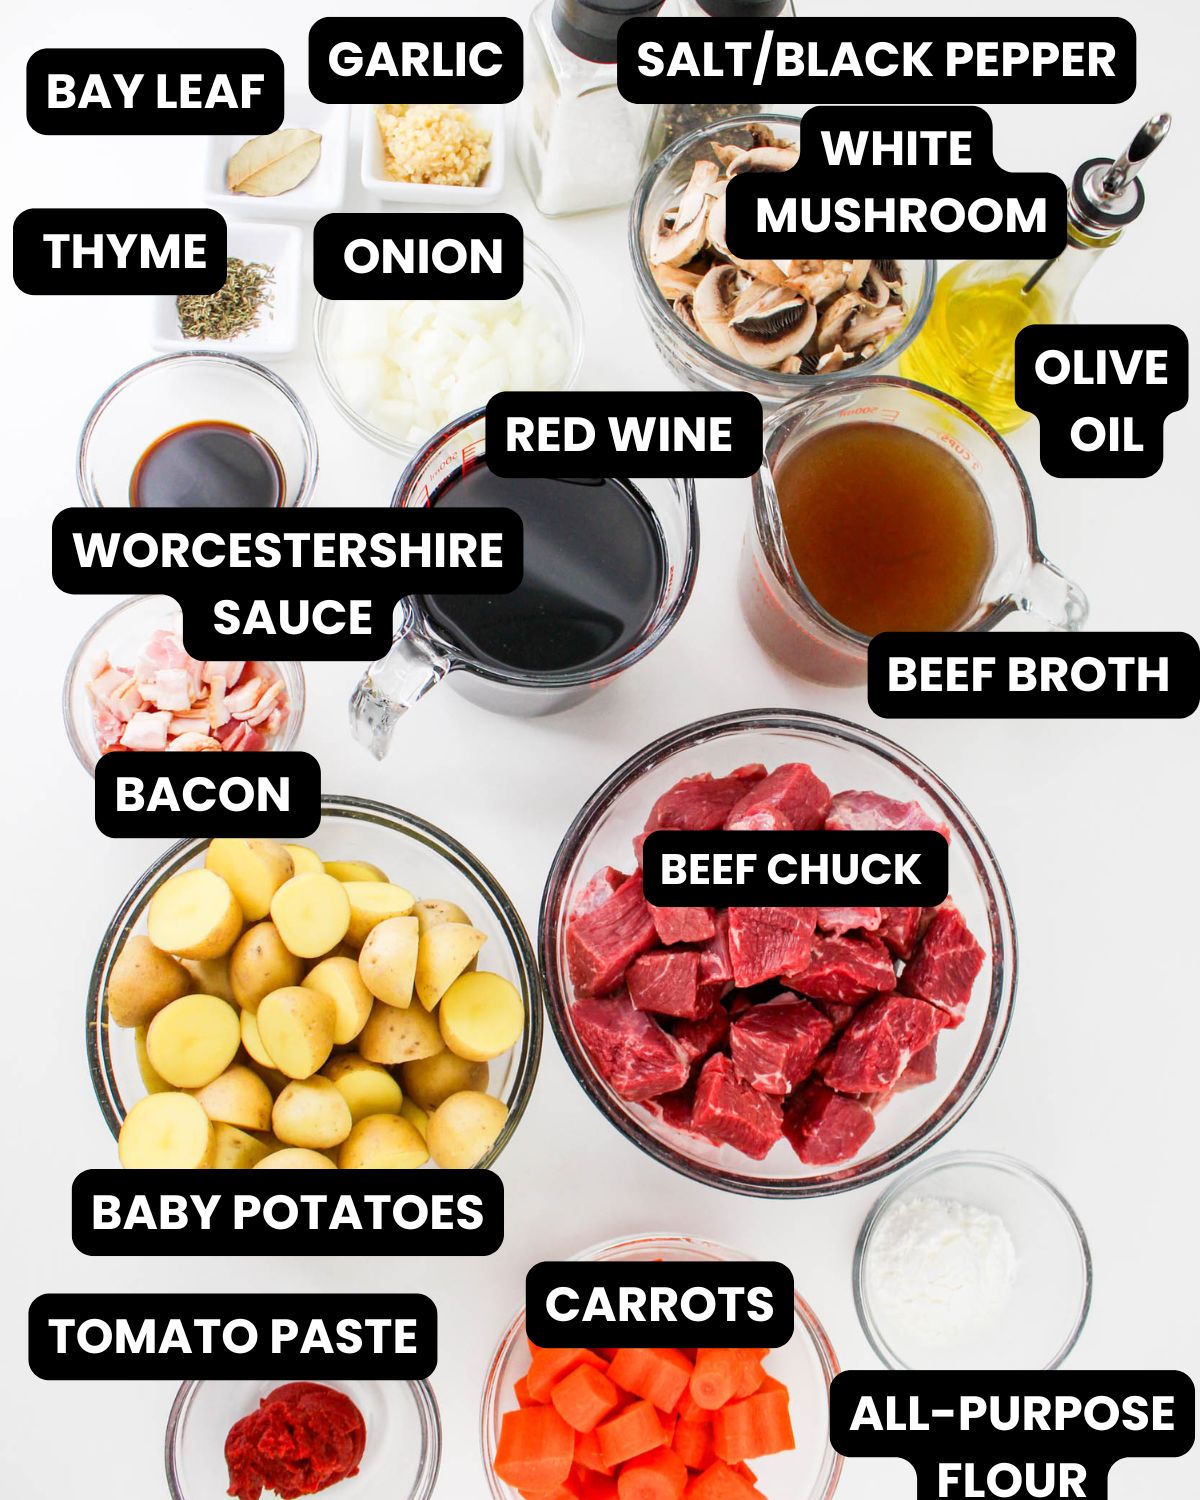
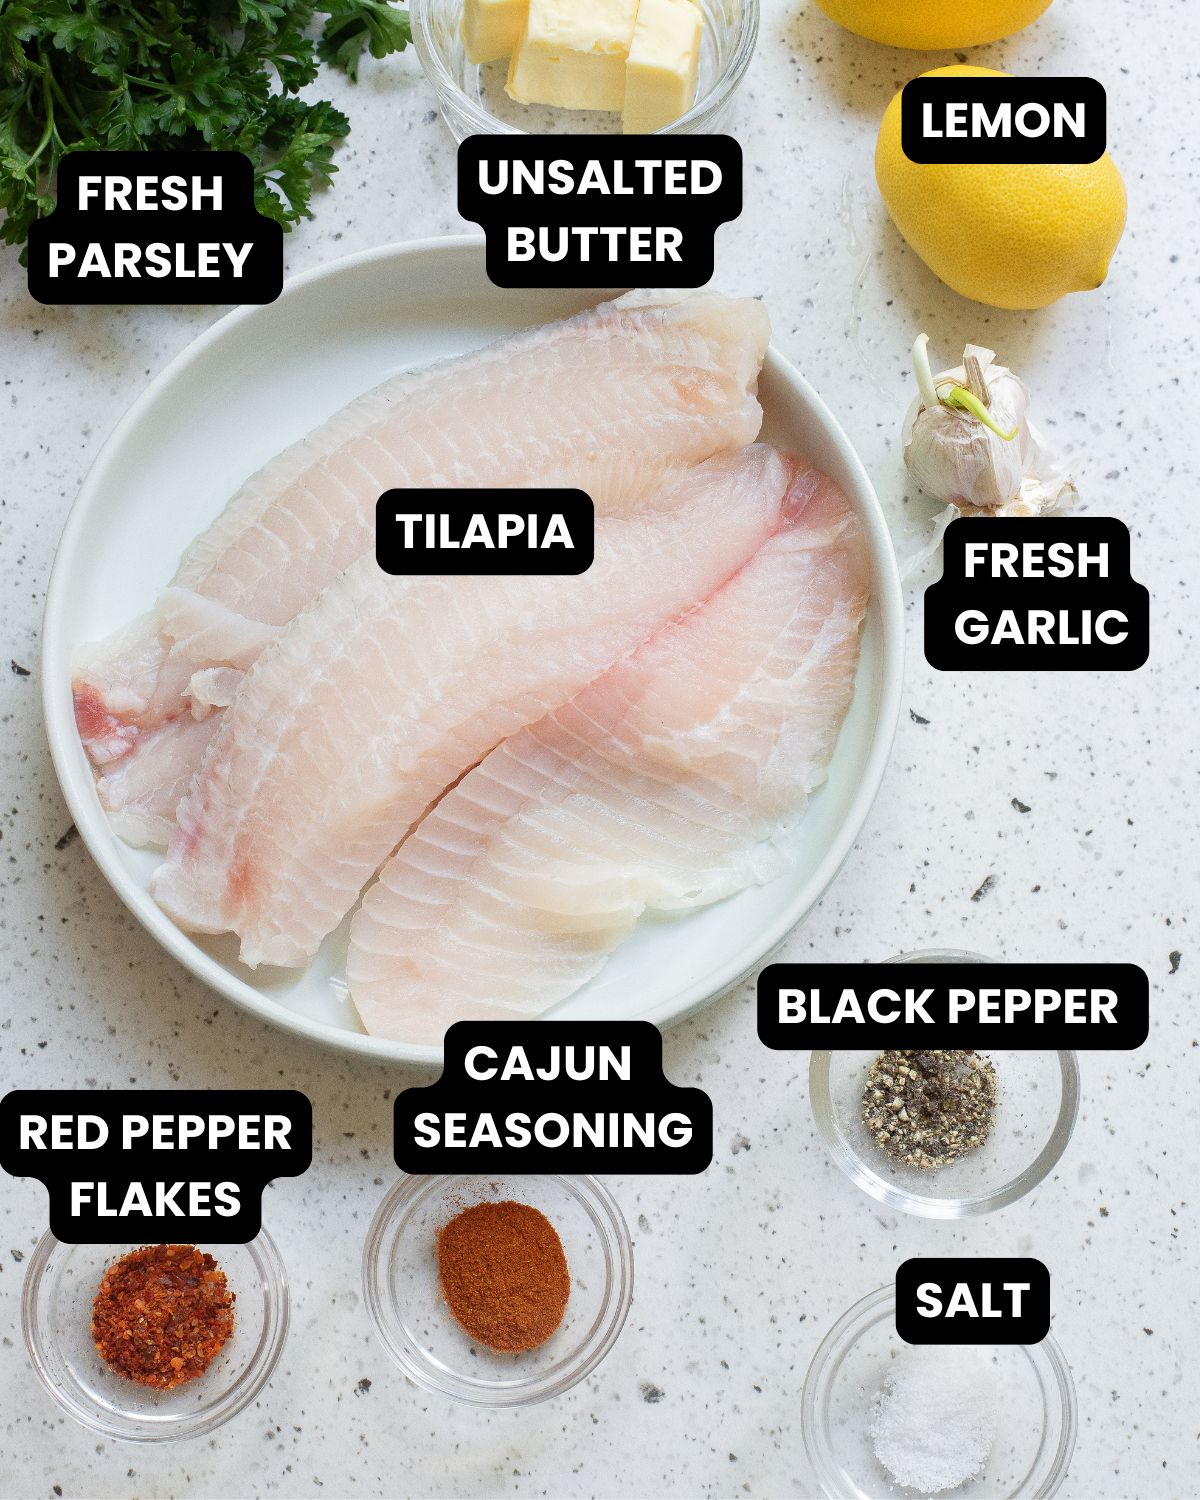
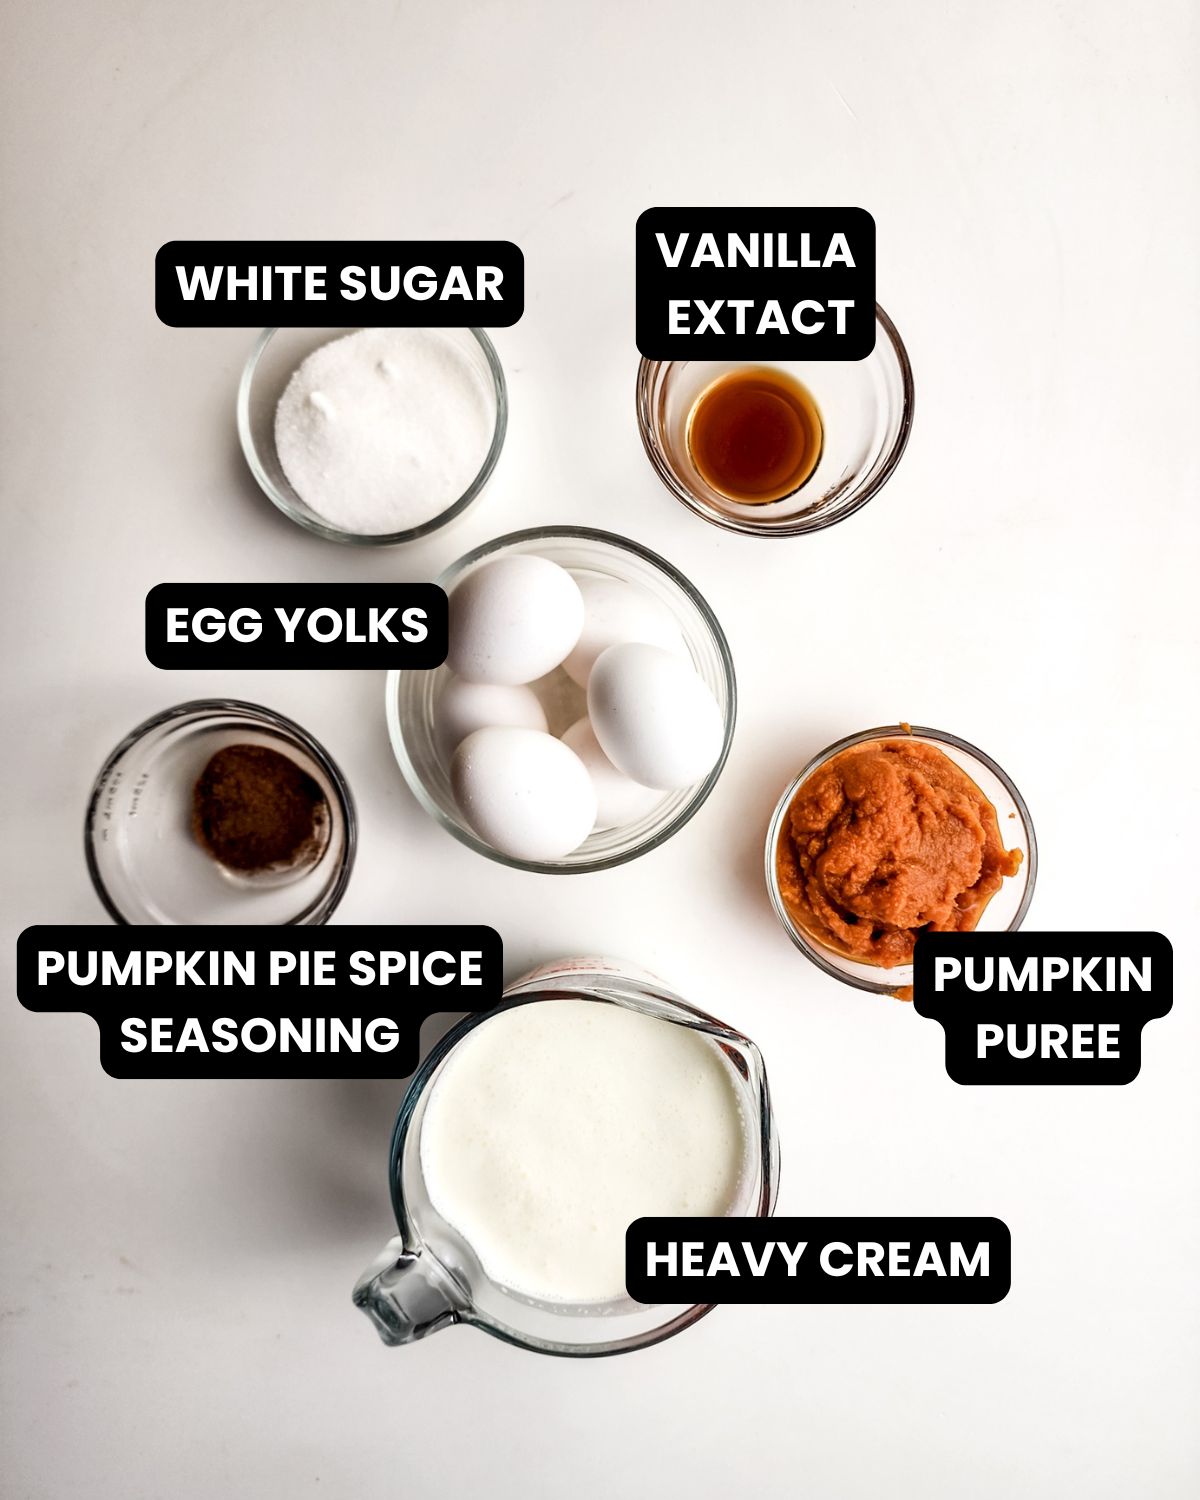
    Ingredient List

    Pumpkin creme brulee ingredients with text overlay.

    As an Amazon Associate, I earn from qualifying purchases.

    • egg yolks
    • granulated sugar
    • pumpkin puree
    • pure vanilla extract
    • pumpkin pie spice seasoning
    • heavy cream
    • hot water

    Equipment

    • Pumpkin Shaped Ramekins or ramekins
    • rimmed baking sheet
    • Butane Torch
    • Heavy Bottom Small Saucepan
    • Wooden Spoon
    • Whisk

    Instructions

    This is an overview of the recipe. The full instructions are below in the recipe card.

    Egg yolks and white sugar in a bowl to make pumpkin creme brulee.
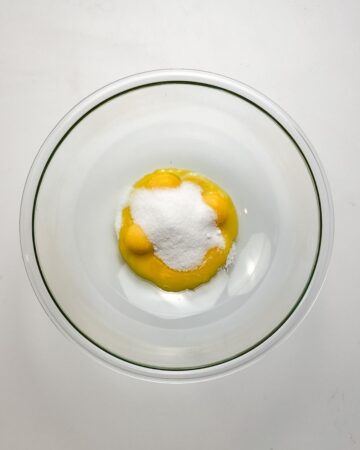
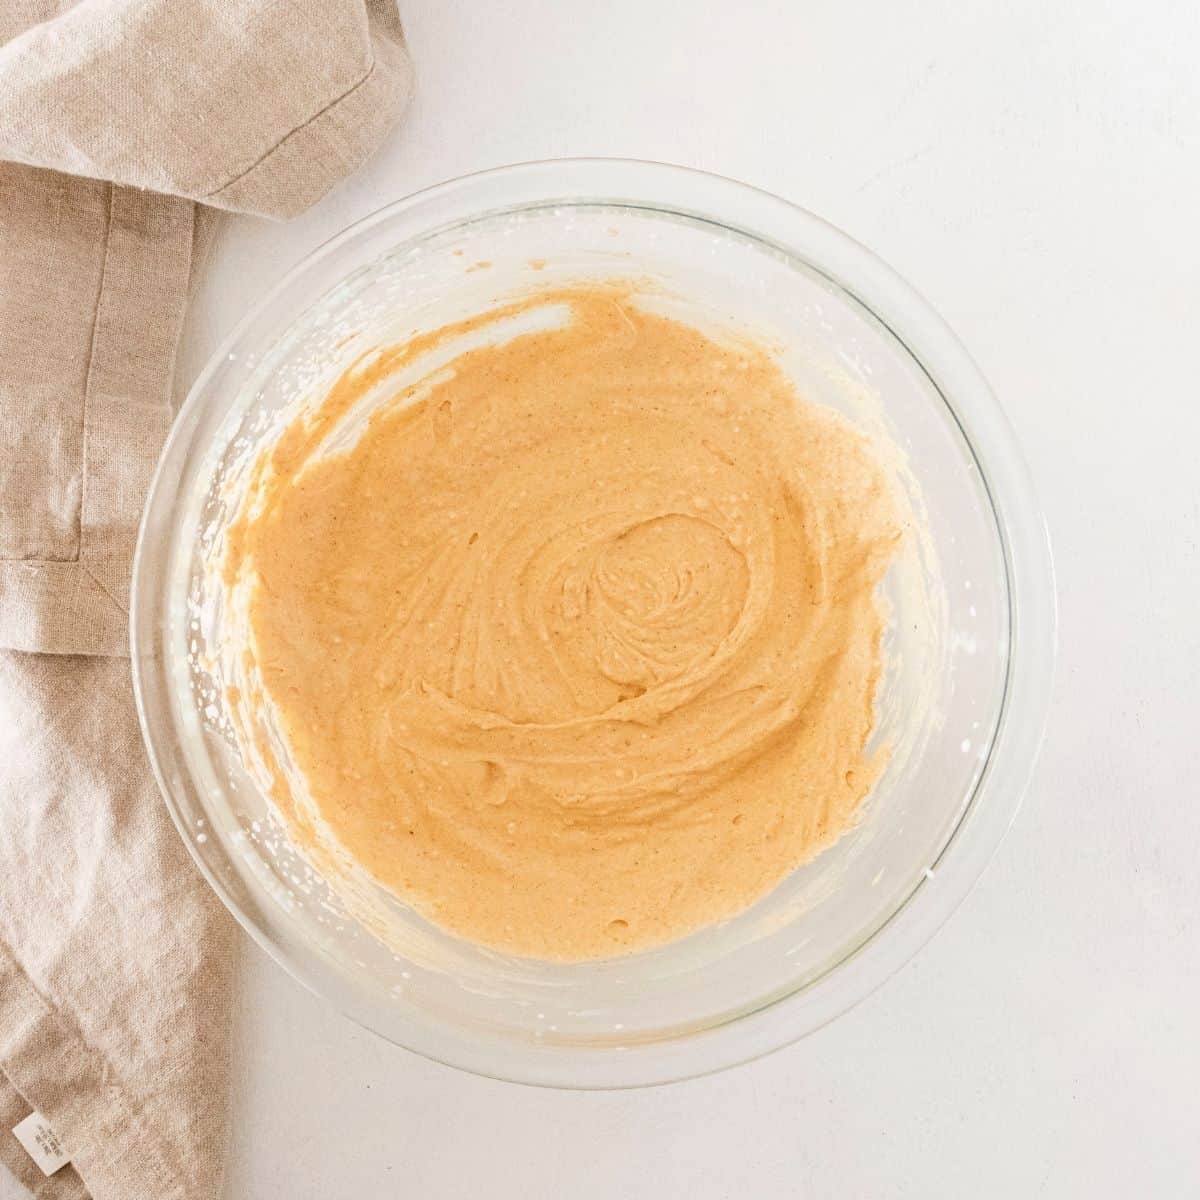
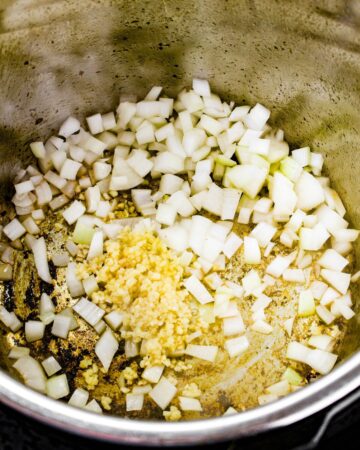
    1. In a medium bowl, whisk together egg yolks and granulated sugar until smooth.
    A glass bowl with whipped egg yolks and white sugar to make creme brulee.
    1. Add pumpkin puree,  pure vanilla extract, and pumpkin pie spice seasoning to the egg mixture and whisk until fully combined.
    A sauce pan with heavy cream being warmed to add to egg yolks to make pumpkin creme brulee.
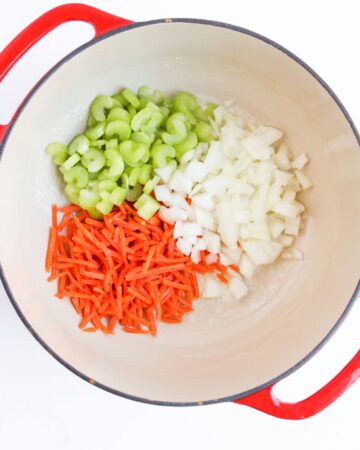
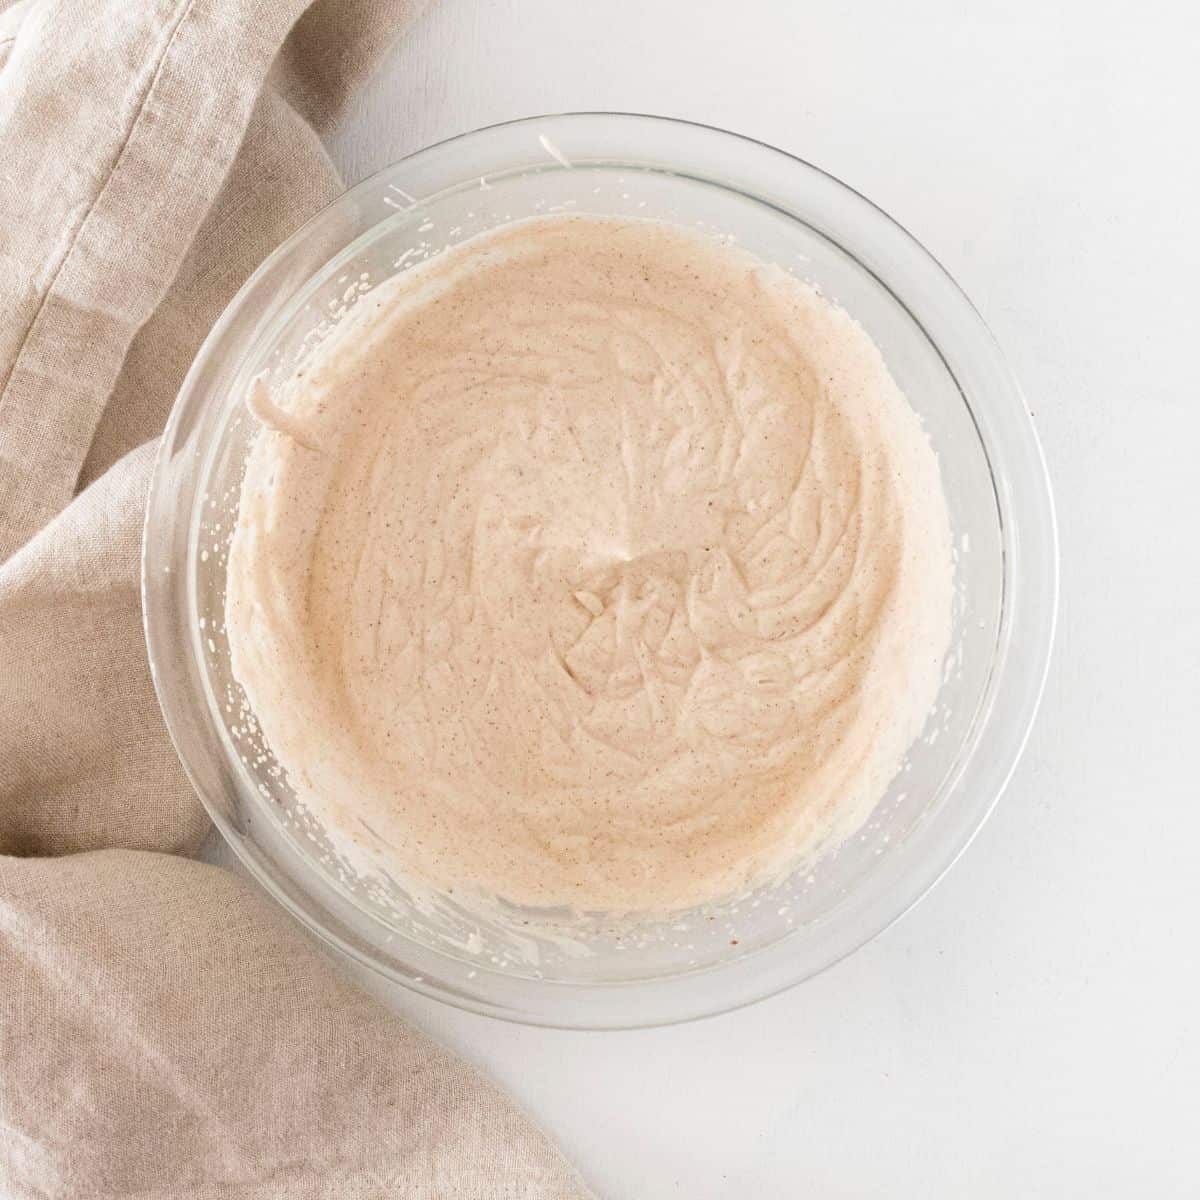
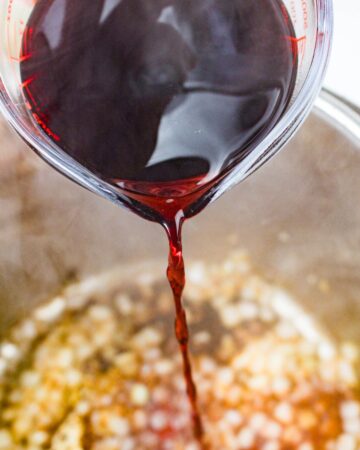
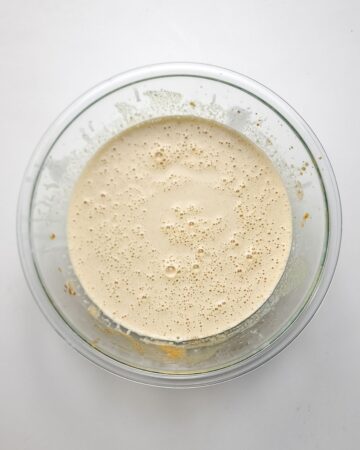
    1. In a small saucepan, heat heavy cream over medium heat until it begins to steam, but not boil. Stir occasionally to prevent scorching.
    A glass bowl with eggs, heavy cream, and pumpkin spice.
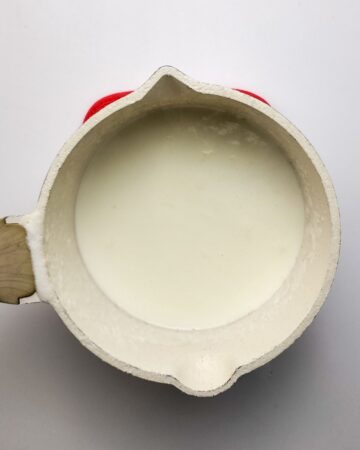
    1. Remove the cream from the heat and slowly pour a small portion into the egg mixture while whisking constantly. Then slowly whisk in the remaining warm milk mixture until combined.
    Ramekins with pumpkin custard to make creme Brulee.
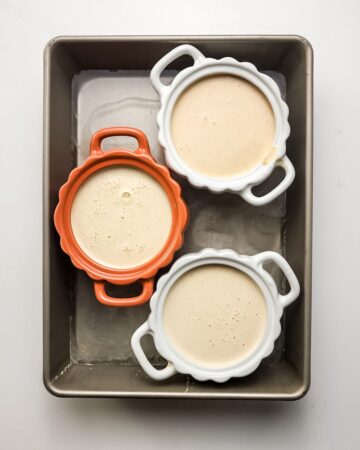
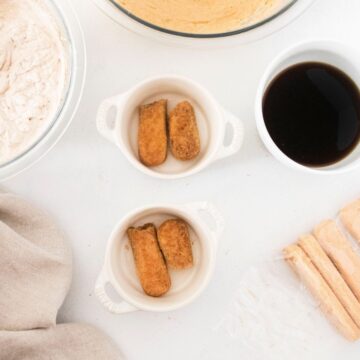
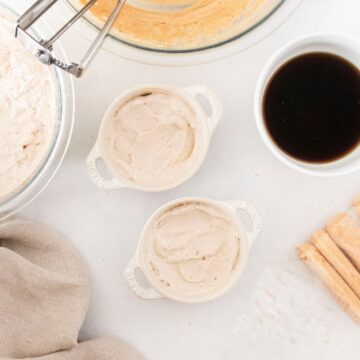
    1. Pour the mixture into ramekins, filling each about ¾ full. Place them in a 9x13- inch baking sheet and a small amount of water.
    Ramekins with pumpkin creme brulee in them.
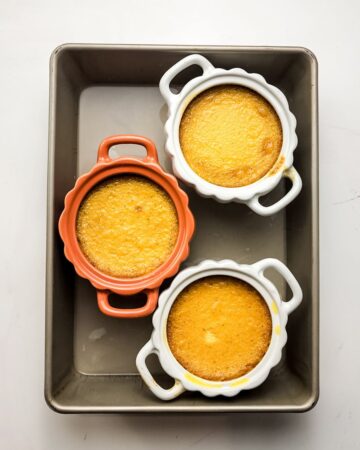
    1. Bake for 50 minutes in the preheated 325 degree oven or until the custard is cooked through. Remove from the water bath and cool.
    Three ramekins with pumpkin custard made into creme Brulee topped with white sugar.
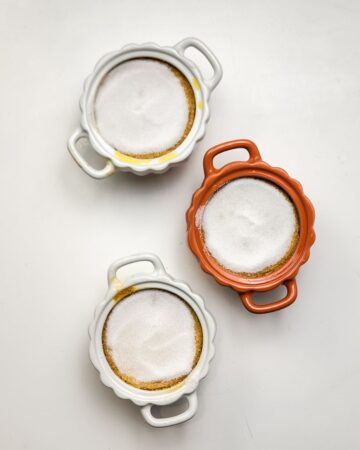
    1. Cool in the fridge for at least 2 hours, and then sprinkle a thin layer of sugar on top.
    Three ramekins with creme brulee topped with sugar ready to be served.
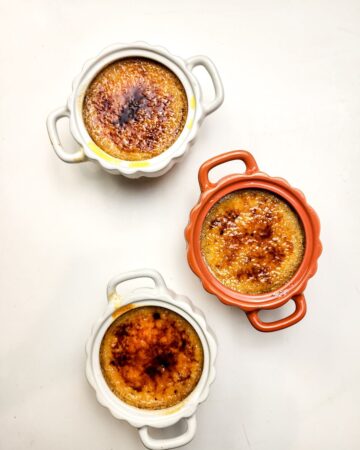
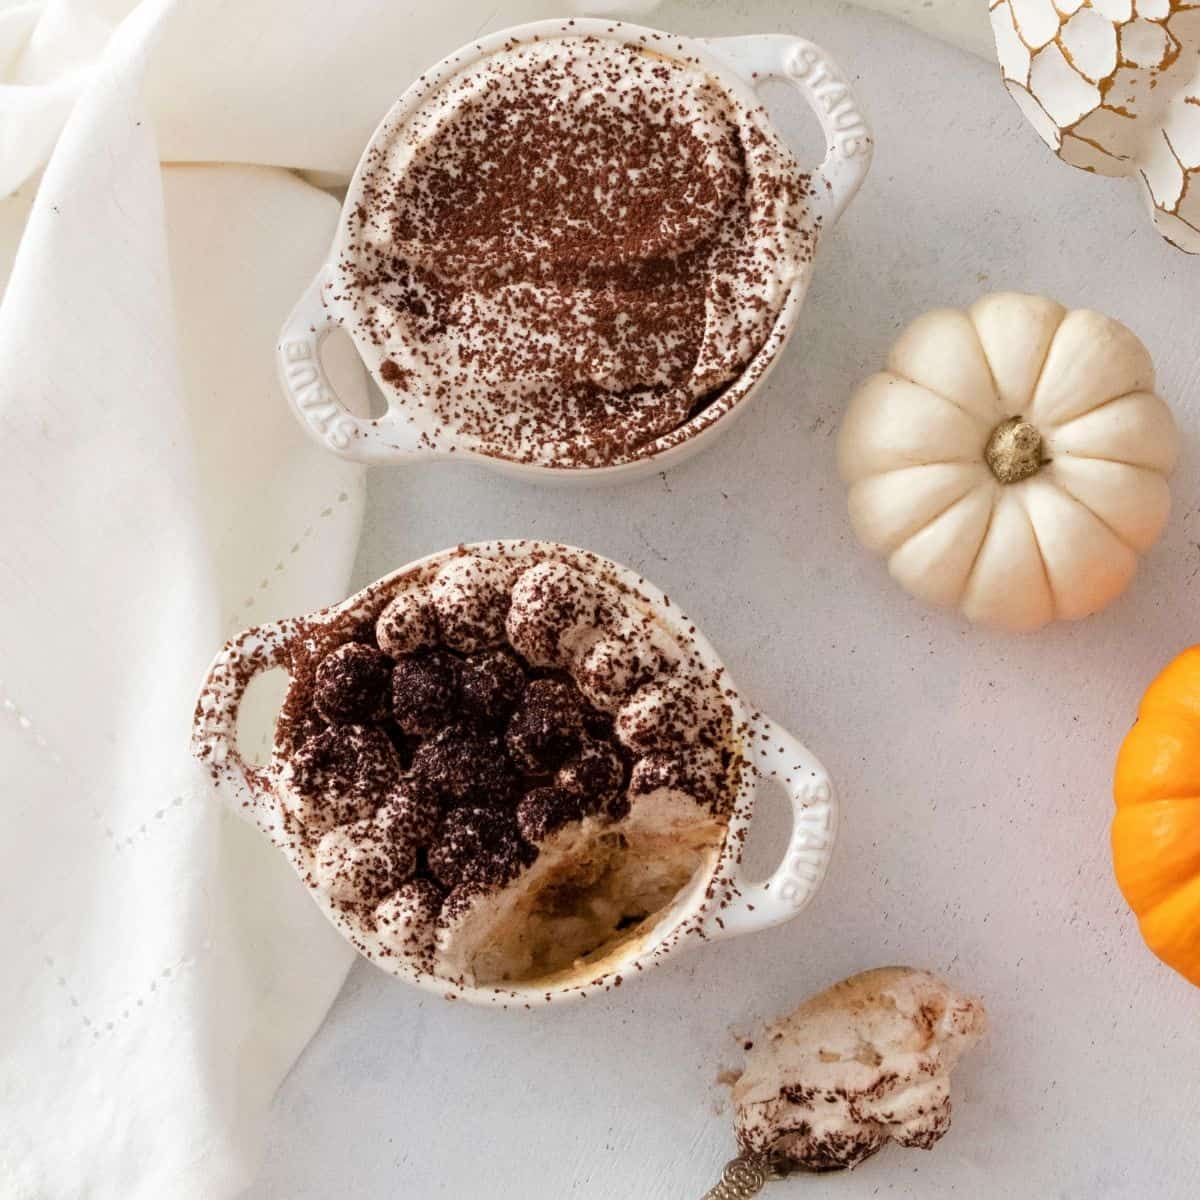
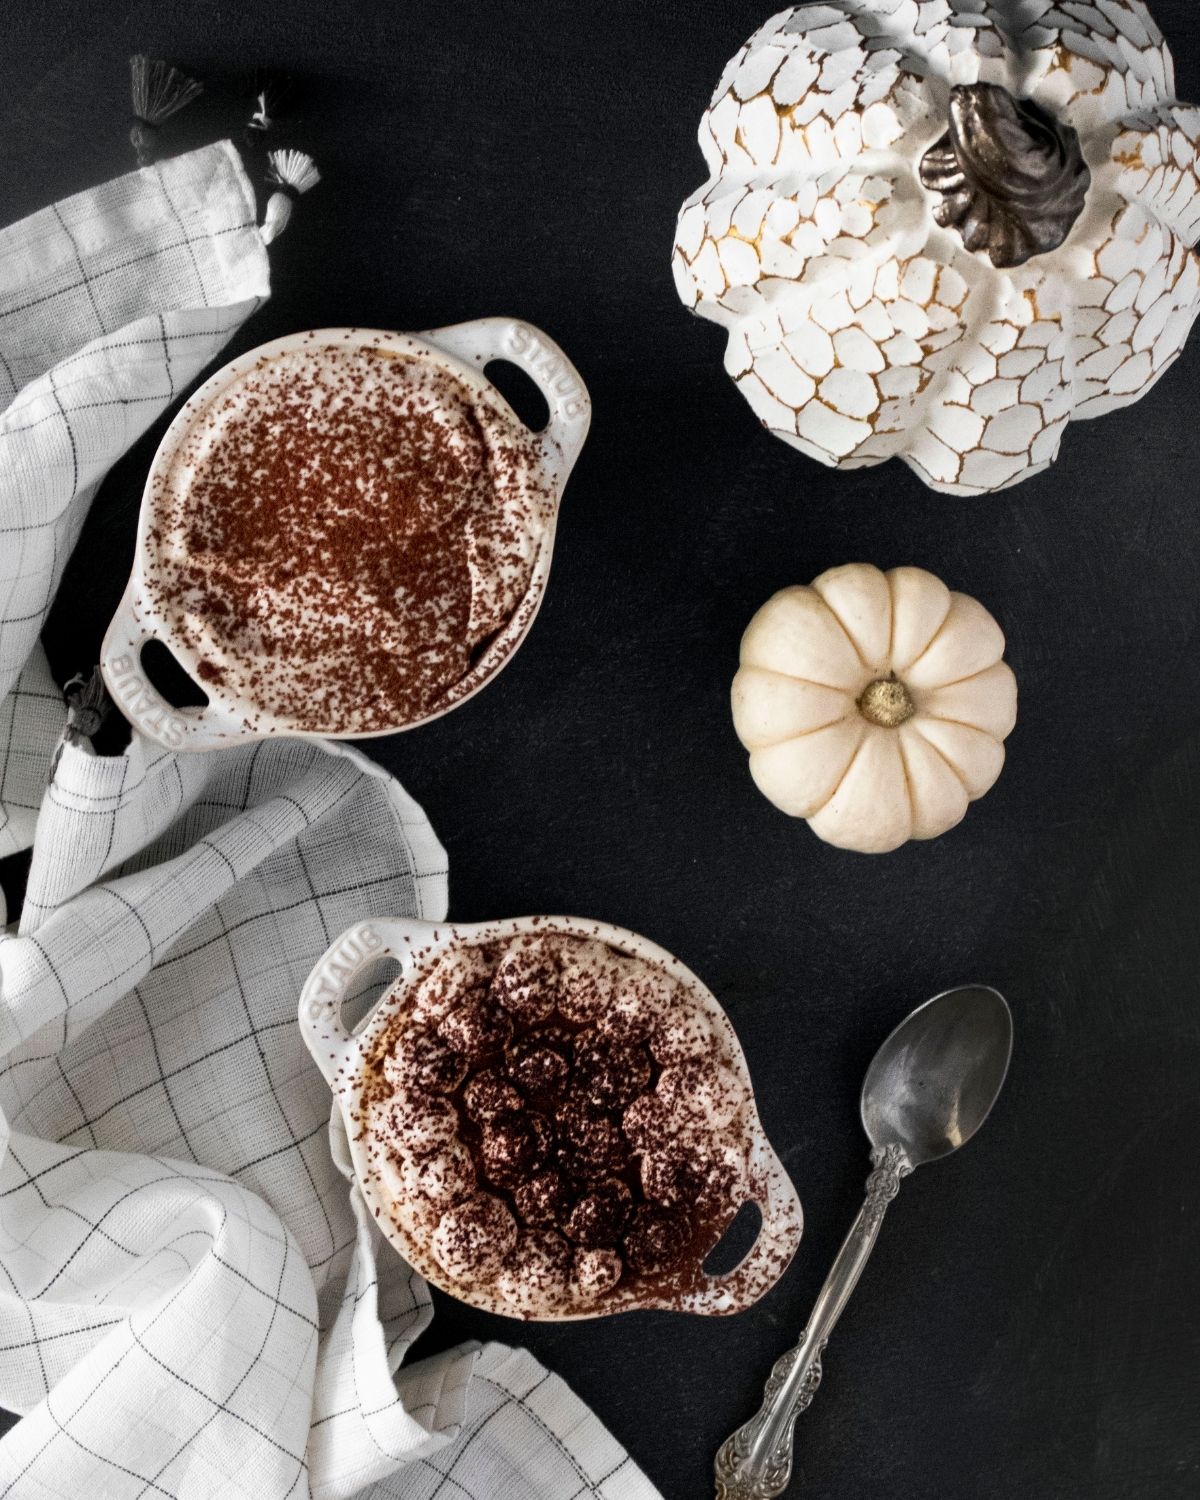
    1. Use a butane tough to caramelize the sugar until golden and bubbly.
    Pumpkin Creme Brulee in a ramkekin on a wooden table.

    Make ahead, storage, and freezer tips

    Storage - Store creme brulee in an airtight container in the refrigerator for up to 3 days. To freeze, wrap ramekins tightly with plastic wrap and aluminum foil and place them in freezer-safe bags for up to a month.

    Eileen's Tips for Success

    • For the water bath, you want it to cover about half of the ramakin so that your custard stays soft while baking.

    Frequently Asked Questions

    What does pumpkin brulee taste like?

    Pumpkin brulee tastes like a creamy pumpkin custard that is full of warm spices, and topped with a crispy sugar topping.

    What's the difference between crème brûlée and custard?

    The main difference is that creme brulee is topped with the crunchy caramelized sugar whereas custard is not.

    Variations

    Do you want to change up this recipe? Here are some ways to change the flavor of this dish.

    • For a little extra flavor, you can add some freshly grated ginger to your custard mixture.
    • You can also add a splash of maple syrup to your custard for a little maple flavor.
    Pumpkin flavored creme brulee in a ramekin.

    Serving Suggestions

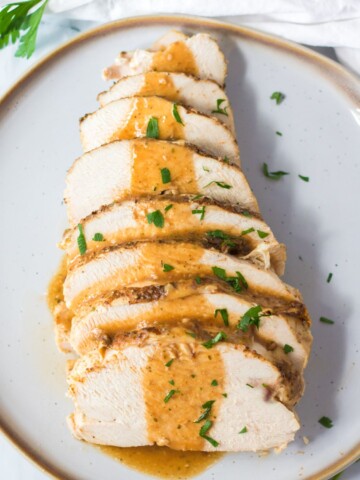
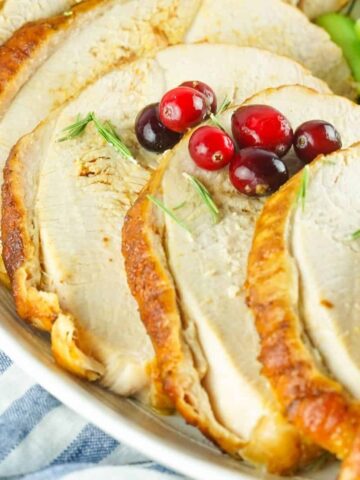
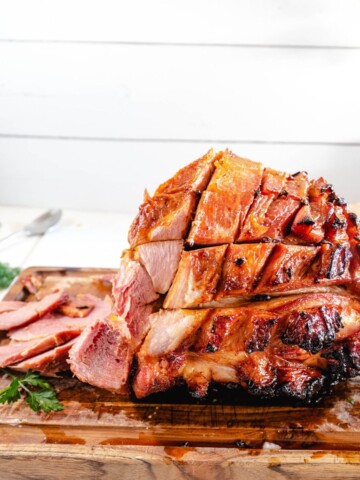
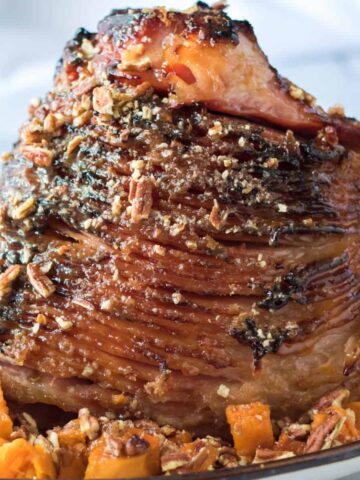
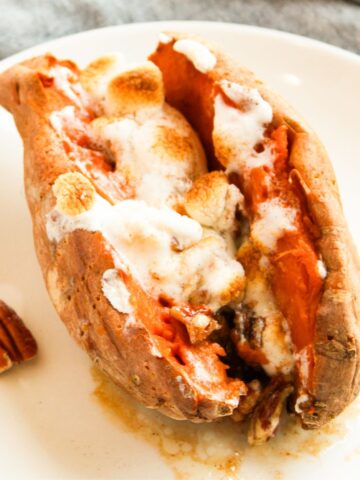
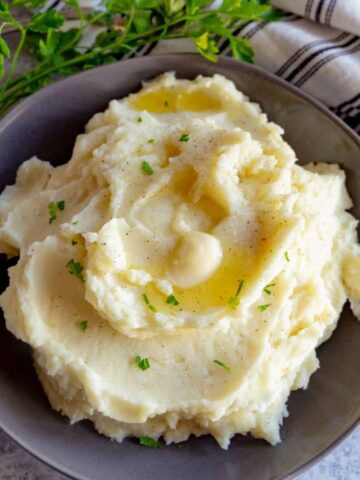
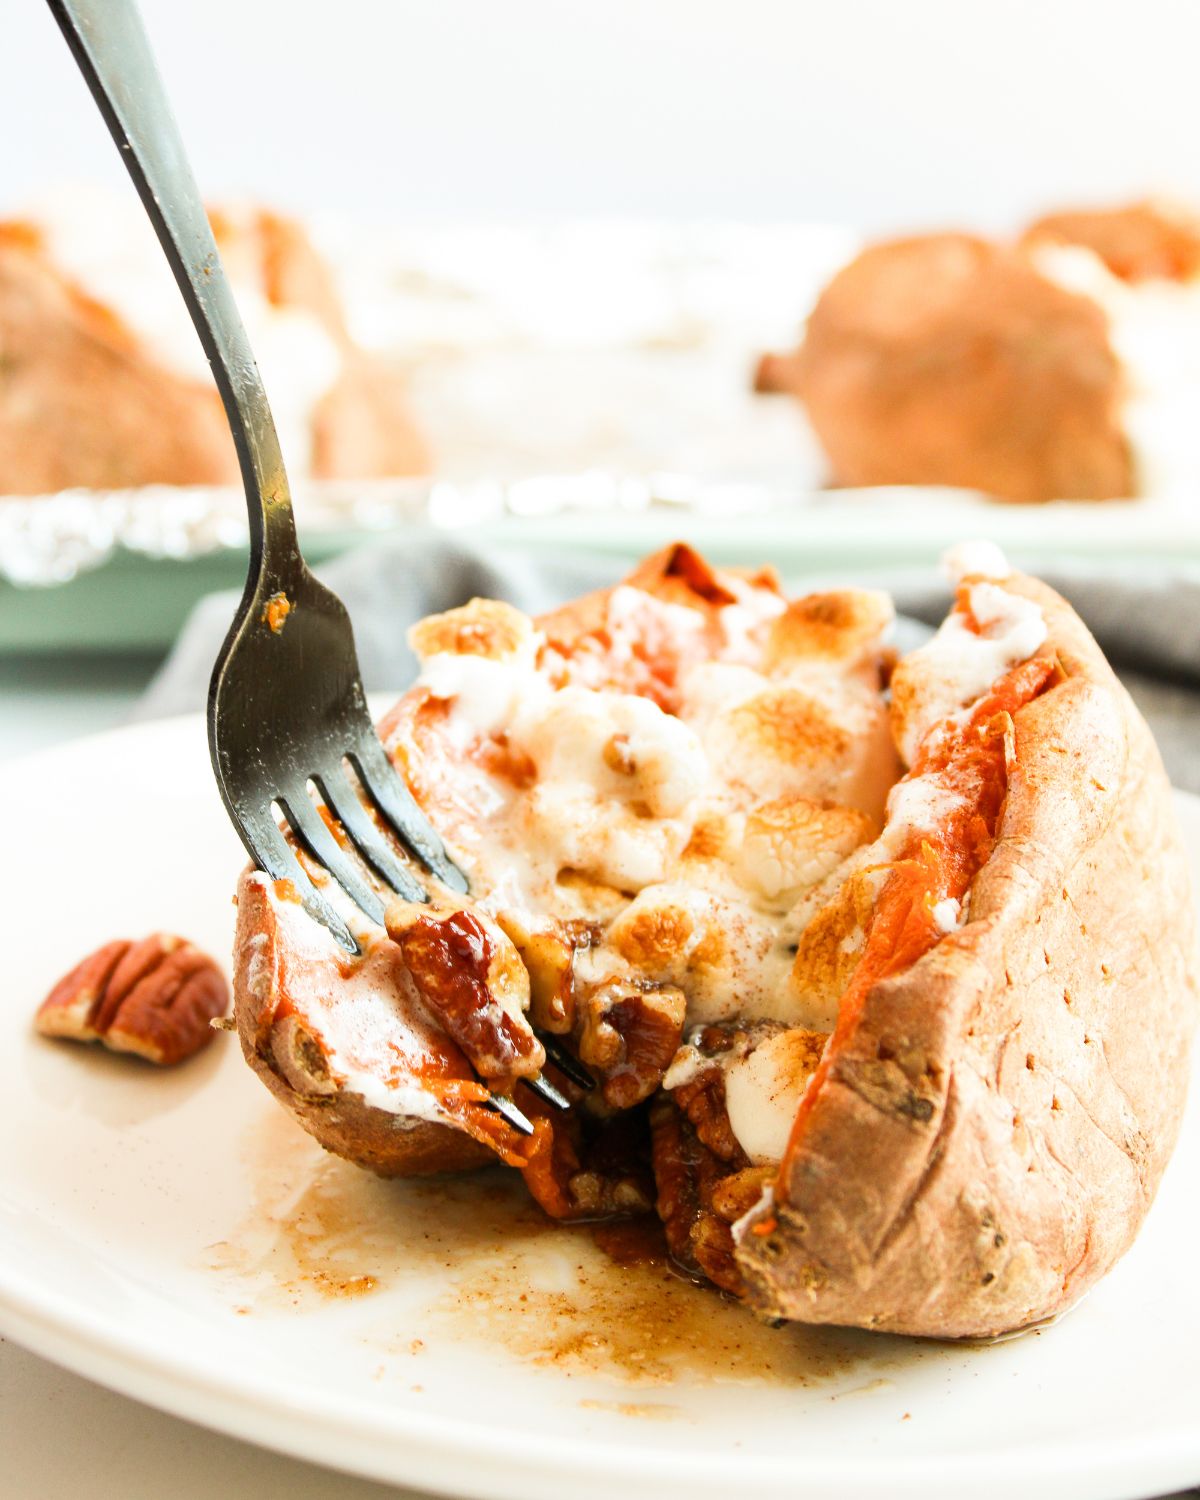
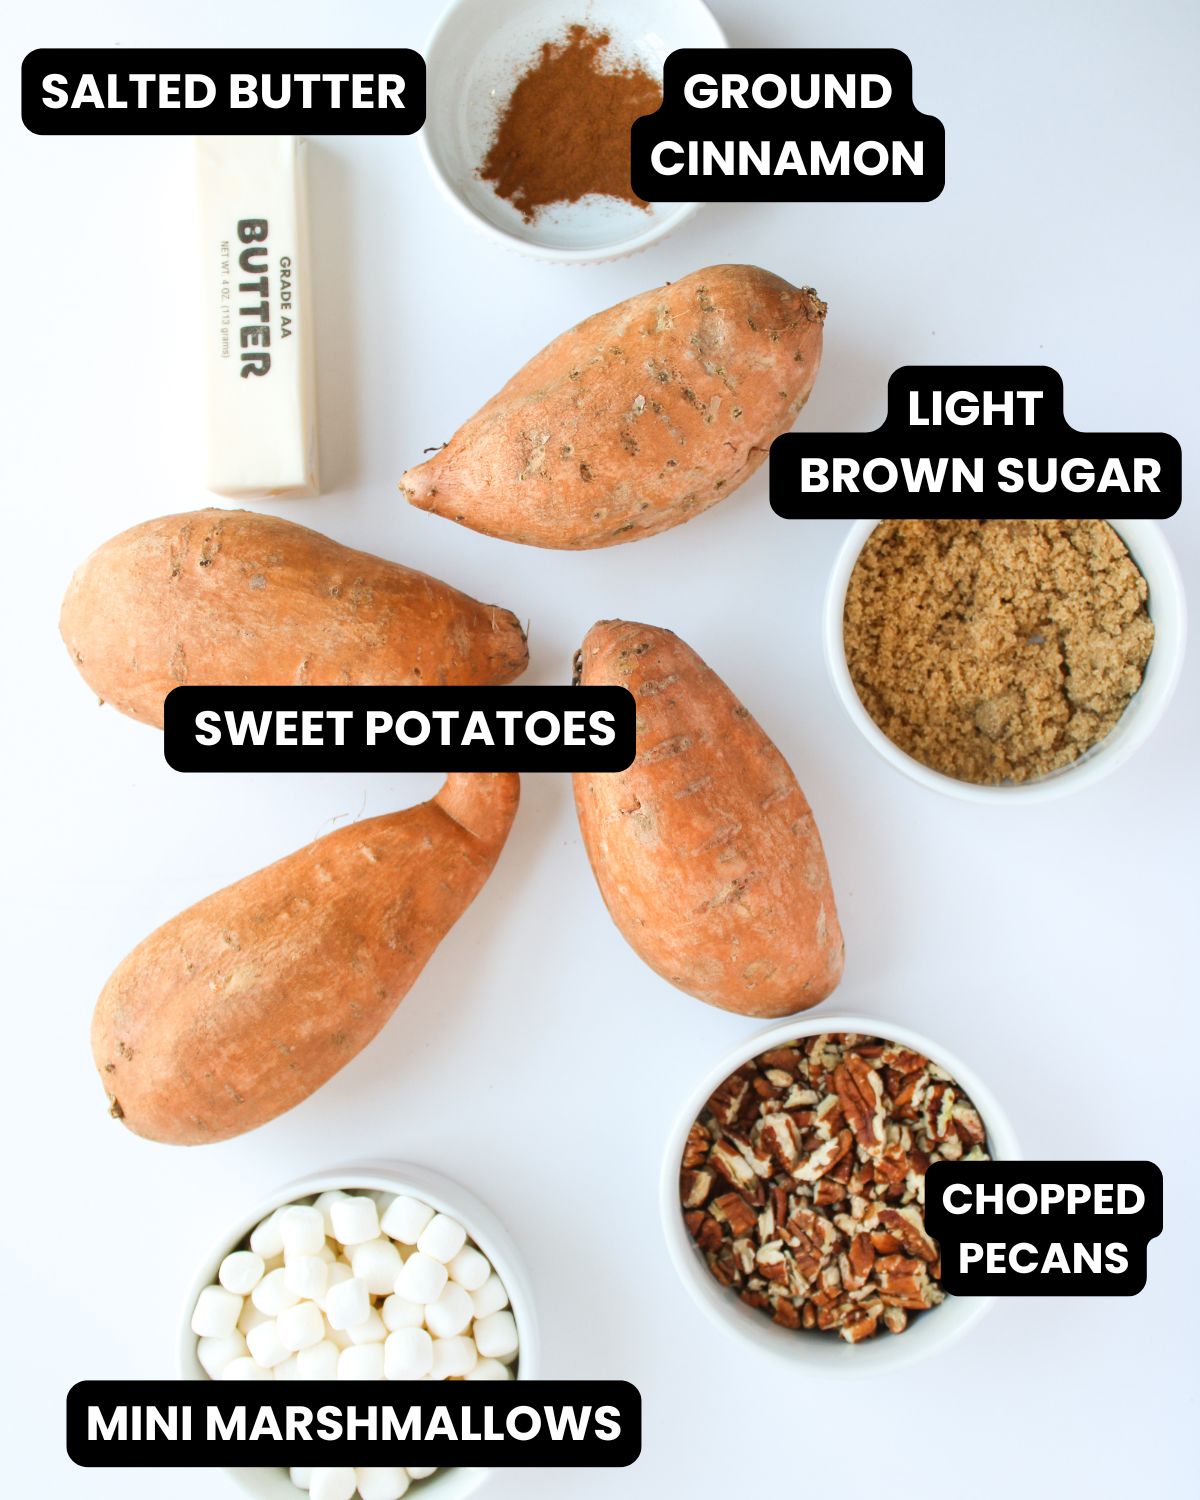
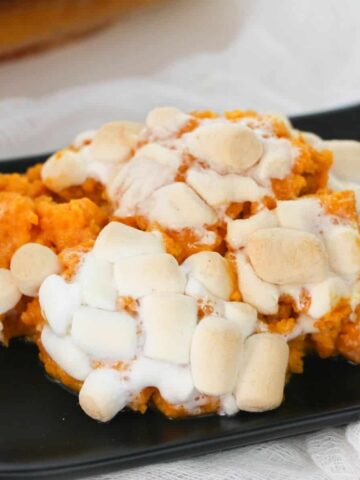
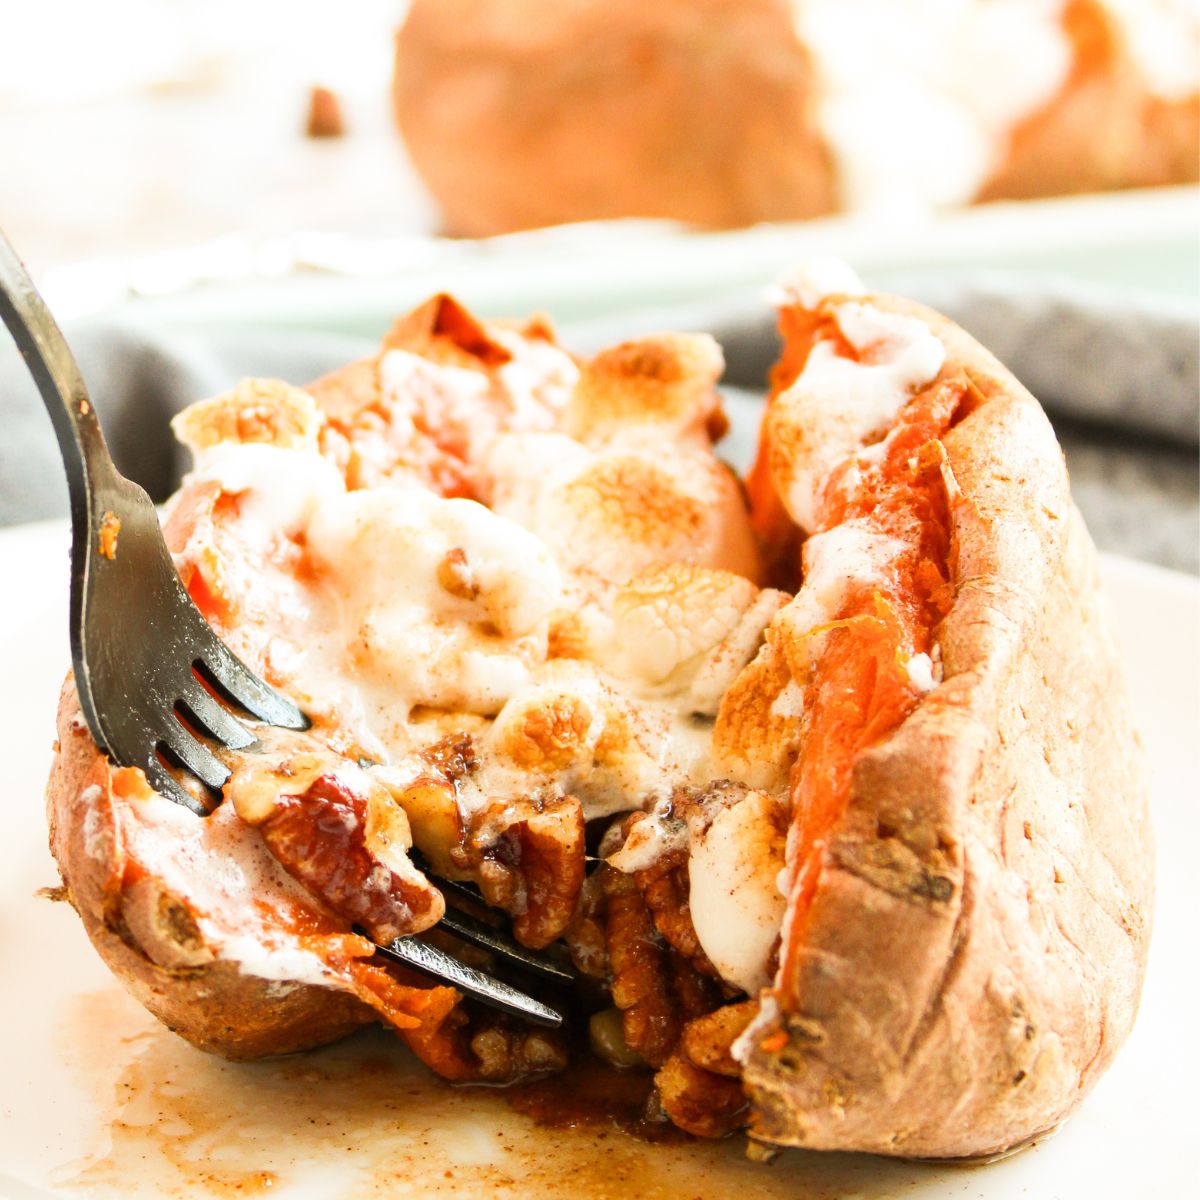
    We love to serve creme brulee with our favorite holiday meal. This Smoked Boneless Turkey Breast, Bacon Wrapped Roasted or these Twice Baked Stuffed Sweet Potatoes are some of our favorite recipes.

    Similar recipes

    Do you love pumpkin recipes? If so, next time give these recipes a try!

    Check out all our desserts here.

    • A loaf pan with pumpkin ice cream with a Biscoff cookie crumble.
      No-Churn Pumpkin Spice Ice Cream
    • Pumpkin tiramisu in individual cocette ceramic bowls.
      Easy Pumpkin Tiramisu Cups
    • Breakfast oat bars sliced and ready to be eaten.
      Cranberry Pumpkin Oat Bars
    • Pumpkin Pie cheesecake, a no bake dessert with whipped cream on top on a square dessert plate.
      No Bake Pumpkin Cheesecake

    I love any comments or questions, please feel free to leave them below.

    Keep up to date with recipes by following me on:

    FACEBOOK  INSTAGRAM, PINTEREST, TWITTER

    Thank you for your continued support. I am forever grateful.

    Eileen  xo

    If you click on the number of servings in the recipe card you can adjust the measurements up or down for the exact number of servings you need.

    📖 Recipe

    A ramekin with pumpkin creme brulee.

    Pumpkin Creme Brulee

    Pumpkin Creme Brulee is an elegant yet easy dessert that anyone can make at home. Just a few simple ingredients and you have a creamy pumpkin custard dessert.
    Print Pin Rate
    Course: Dessert
    Cuisine: French
    Keyword: pumpkin creme brulee
    Prep Time: 30 minutes minutes
    Cook Time: 50 minutes minutes
    cool to room temperature and refrigerate: 2 hours hours 30 minutes minutes
    Total Time: 3 hours hours 50 minutes minutes
    Servings: 6 ramekins
    Calories: 786kcal
    Author: Eileen Murphy Kelly

    Equipment

    • Pumpkin Shaped Ramekins or ramekins
    • rimmed baking sheet
    • Butane Torch
    • Heavy Bottom Small Saucepan
    • Wooden Spoon
    • Whisk

    Ingredients

    • 6 large egg yolks
    • ⅓ cup granulated sugar
    • ¾ cup pumpkin puree
    • 1 teaspoon pure vanilla extract
    • 2 teaspoons pumpkin pie spice seasoning
    • 4 cups heavy cream
    • hot water enough for the bottom of the baking pan

    Topping

    • granulated sugar

    Instructions

    • Preheat your oven to 325°F (163°C).
    • In a medium-sized mixing bowl, whisk together 6 egg yolks and ⅓ cup granulated sugar until smooth and slightly pale.
    • Add ¾ cup pumpkin puree, 1 teaspoon pure vanilla extract, and 2 teaspoons pumpkin pie spice seasoning to the egg mixture and whisk until fully combined.
    • In a small saucepan, heat 4 cups heavy cream over medium heat until it begins to steam, but not boil. Stir occasionally to prevent scorching.
    • Remove the heavy cream from the heat and slowly pour a small portion into the egg mixture while whisking constantly to temper the eggs (to prevent curdling). Then slowly whisk in the remaining warm milk mixture until combined.
    • Pour the mixture into pumpkin-shaped ramekins or regular ramekins, filling each about ¾ full.
    • Place the ramekins on a 9x13-inch baking sheet.
    • Carefully pour hot water onto the baking sheet around the ramekins, creating a water bath (about halfway up the sides of each ramekin).
    • Bake for 50 minutes or until the custard is set but still slightly wobbly in the center.
    • Remove the ramekins from the water bath and let them cool to room temperature.
    • Once cooled, refrigerate the creme brulees for at least 2 hours, or until fully chilled.
    • Just before serving, sprinkle a thin layer of white sugar over the top of each creme brulee.
    • Using a butane torch, carefully caramelize the sugar by moving the flame in a circular motion over the surface until it turns golden and bubbly.
    • Allow the sugar to harden for a minute before serving. Enjoy!

    Notes

    Be sure to check Expert Tips and FAQs above with important tips and questions that can help make a delicious recipe. 
    Servings: Depending on the size of the ramekins, this recipe will serve between 4 and 6 servings. 
    Storage - Store creme brulee in an airtight container in the refrigerator for up to 3 days. To freeze, wrap ramekins tightly with plastic wrap and aluminum foil and place them in freezer-safe bags for up to a month.
     
    I'm not a registered dietician, I do my best to provide the most accurate nutritional values. Any nutritional data I provide is an approximation. Actual dietary information can vary based on ingredients and portion sizes. 
    • Don’t forget to shop at the Everyday Eileen store on Amazon
     

    Nutrition

    Serving: 1ramekin | Calories: 786kcal | Carbohydrates: 23g | Protein: 9g | Fat: 75g | Saturated Fat: 46g | Polyunsaturated Fat: 4g | Monounsaturated Fat: 20g | Cholesterol: 448mg | Sodium: 64mg | Potassium: 287mg | Fiber: 1g | Sugar: 20g | Vitamin A: 8832IU | Vitamin C: 3mg | Calcium: 169mg | Iron: 1mg

    Easy Oven Roasted Turkey

    November 21, 2024 Leave a Comment

    A sliced whole roasted turkey on a platter.

    We have an Easy Oven Roasted Turkey recipe to make for Thanksgiving. Our herb butter turkey is flavorful, juicy, and perfect for all to enjoy. It's great for beginners and can help reduce stress on Thanksgiving day.

    Roasted turkey sliced on a platter.

    For specifics on the recipe use the table of contents to click on sections of the recipe.

    [feast_advanced_jump_to]

    Why you'll love this recipe

    • It's easy to make and great for novices.
    • It's juicy and flavorful and turns out perfectly every time.
    • The perfect dish for Thanksgiving dinner.

    Ingredient List

    Ingredients with text overlay to make roast turkey.

    As an Amazon Associate, I earn from qualifying purchases.

    Herbed Butter:

    • unsalted butter
    • olive oil
    • chopped fresh herbs: thyme, rosemary, sage,
    • Kosher salt 
    • black pepper
    • onion powder
    • garlic powder
    • paprika

    Turkey Cavity:

    • 10-12 pound bone-in turkey
    • kosher salt
    • black pepper
    • onion powder
    • yellow onion
    • celery stalk
    • carrot
    • garlic

    Roasting pan:

    • yellow onion

    Equipment

    • Cutting Board
    • knife
    • Measuring Spoons and Cups
    • Pastry Brush
    • 10" x 7" Roasting Pan with Rack
    • Instant Read Thermometer

    Instructions

    This is an overview of the recipe. The full instructions are below in the recipe card.

    1. Preheat oven to 425°F/218°C. Have a roasting pan with a rack ready for the turkey. Set aside.

    How to make Herb Butter:

    A bowl with butter, herbs and spices for a roast turkey with herb butter.
    1. Combine softened butter with olive oil, chopped herbs, and spices. over medium heat, add the butter, and stir in olive oil, herbs, salt, pepper, onion powder, and garlic powder. Stir and melt the butter, for about 2-3 minutes. ( this can also be done in a microwave-safe bowl). Remove from heat, and set aside.

    Prepare the turkey:

    A turkey with herbed butter and a cavity filled with herbs, carrots, garlic, and onion.
    1. Fill the seasoned turkey cavity with onion, celery, carrots, garlic, and fresh herbs.

    How to Roast Herb Turkey:

    Herb Butter Roasted Turkey in a roasting pan.
    1. Cover the turkey with aluminum foil and place it in the preheated oven for 20 minutes.
    2. After 20 minutes, reduce the oven temperature to 325°F/163°C. Keep the foil on the turkey but baste the turkey every 20 minutes to ensure a nicely browned turkey.
    3. After hour 2 of cooking, remove the aluminum foil and continue cooking the turkey for at least one more hour also baste every 20 minutes until the internal temperature reaches 165°F/74°C. Use an instant-read thermometer to get an accurate temperature of the turkey.
    4. Once the turkey has reached 165°F, remove the roasting pan from the oven. Let the turkey cool for about 10 minutes before removing it from the roasting pan and let it cool on a cutting board for another 20 minutes before slicing.
    An oven roasted turkey on a platter with fresh herbs

    Make ahead, storage, and freezer tips

    Storage - The roasted turkey can be stored in an airtight container in the refrigerator for up to 3 days.

    Freezer: The leftover turkey meat can be frozen in freezer-safe storage bags or containers for up to 3 months. Defrost overnight in the refrigerator and use in your favorite recipes.

    Use instead of chicken in any favorite recipe that uses rotisserie chicken.

    Eileen's Tips for Success

    • When roasting the turkey, be aware of the internal temperature of the turkey so that it cooks until 165°F.
    • Let the turkey rest for at least 30 minutes before carving to ensure the juices settle in the turkey
    • Leftover turkey is perfect for Turkey Cranberry Sliders.

    Frequently Asked Questions

    Is it better to cook a turkey at 325°F or 350°F?

    I prefer to cook my turkey at 325°F/163°C. This ensures a more moist and juicy bird.

    How long does a turkey take to cook in the oven?

    An unstuffed turkey should be cooked at 13 minutes per pound. You should cook a stuffed turkey at 15 minutes per pound.

    What do you put in a turkey cavity?

    There are so many things you can add to the cavity of a turkey, but I like to add aromatics like carrots, celery, onions, and herbs to my easy roast turkey.

    Variations

    Do you want to change up this recipe? Here are some ways to change the flavor of this dish.

    • Sage Butter Roasted Turkey: Substitute sage for the thyme in the herb butter.
    • Rosemary Garlic Roasted Turkey: Substitute rosemary for the thyme in the herb butter and add 4 cloves of minced garlic to the pan.
    • Lemon Pepper Roasted Turkey: Add the zest of 1 lemon to the herb.
    • Cajun Seasonings is another great alternative for a spice rub.
    Sliced roasted tukey with an herb butter

    Serving Suggestions

    • Southern Cornbread Dressing
    • Instant Pot Mashed Potatoes
    • Cranberry Sauce
    • Homemade Mashed Potatoes
    • Oven-roasted green bean recipe
    • Make Ahead Gravy
    • Twice Baked Sweet Potatoes

    Thanksgiving Sweets:

    • Pecan Pie Muffins
    • Pumpkin Ice Cream
    • Pecan Pie Cheesecake Bars
    • Pumpkin Banana Bread
    • Pecan Pie Cheesecake
    • No Bake Pumpkin Cheesecake
    • Pumpkin Cream Brulee

    Similar recipes

    • Bourbon Maple Glazed Turkey Breast
    • Air fryer turkey breast 
    • Easy Maple Glazed Ham
    • See all our Thanksgiving recipes here.
    • Slow cooker turkey made in the slow cooker topped with gravy.
      Slow Cooker Boneless Turkey Breast
    • Sliced smoked turkey in a white plate topped with cranberries and rosemary pieces.
      Smoked Boneless Turkey Breast
    • A cooked honey glazed ham on a wooden cutting board.
      Baked Honey Glazed Ham Recipe
    • Pecan Praline Glazed Ham

    I love any comments or questions, please feel free to leave them below.

    Keep up to date with recipes by following me on:

    FACEBOOK  INSTAGRAM, PINTEREST, TWITTER

    Thank you for your continued support. I am forever grateful.

    Eileen  xo

    If you click on the number of servings in the recipe card you can adjust the measurements up or down for the exact number of servings you need.

    📖 Recipe

    A sliced whole roasted turkey on a platter.

    Easy Roasted Turkey Recipe

    This is our easiest, no-fuss homemade roast turkey that delivers the juiciest and tender results. A perfect first-time turkey maker will love how easy it is to make this recipe. For the more experienced home cook, feel free to use this recipe as your base and add in some fresh herbs and spices to the butter oil mixture.
    Print Pin Rate
    Course: Main Course
    Cuisine: American
    Keyword: easiest roast turkey, oven roasted turkey, roasted turkey
    Prep Time: 20 minutes minutes
    Cook Time: 3 hours hours
    rest time: 30 minutes minutes
    Total Time: 3 hours hours 50 minutes minutes
    Servings: 8 servings
    Calories: 747kcal
    Author: Eileen Murphy Kelly

    Equipment

    • Cutting Board
    • knife
    • Measuring Spoons and Cups
    • Pastry Brush
    • 10" x 7" Roasting Pan with Rack
    • Instant Read Thermometer

    Ingredients

    • 11-12 pound whole turkey

    Herbed Butter

    • 5 Tablespoons unsalted butter room temperature
    • 2 Tablespoons olive oil
    • 2 Tablespoons fresh herbs chopped, Note 1
    • 1 teaspoon Kosher salt Note 2
    • 1 teaspoon black pepper
    • 1 teaspoon garlic powder
    • 1 teaspoon onion powder
    • 1 teaspoon paprika

    Turkey Cavity

    • ½ teaspoon kosher salt
    • ½ teaspoon black pepper
    • ½ teaspoon onion powder
    • 1 large yellow onions peeled and sliced in half, divided
    • 2 stalks celery chopped into thirds
    • 1 large carrot peeled and chopped into thirds
    • 3 cloves garlic peeled
    • 3 sprigs fresh thyme
    • 3-4 sprigs fresh parsley

    Roasting Pan

    • 1 medium yellow onion peeled and chopped

    Instructions

    • Preheat oven to 425°F/218°C. Have a roasting pan with rack ready for the turkey.

    How to make Herb Butter

    • Ina small bowl, mix 5 Tablespoons unsalted butter, 2 Tablespoons olive oil, 2 Tablespoons chopped herbs, 1 teaspoon Kosher salt, 1 teaspoon black pepper, 1 teaspoon garlic powder, 1 teaspoon onion powder, and 1 teaspoon paprika to combine the ingredients into a paste.
    • Set aside while preparing the turkey

    Prepare the turkey

    • Prepare the turkey by removing the giblets. ( Note 3) Use a paper towel to pat dry the turkey both inside and out.
    • Set the turkey on the rack in the roasting pan. Rub the herb butter on the entire turkey, under the skin and on top of the skin.

    Cavity of the turkey

    • In a small bowl combine ½ teaspoon kosher salt, ½ teaspoon black pepper, and ½ teaspoon onion powder. Sprinkle the mixture inside the cavity of the turkey.
    • To the seasoned cavity of the turkey, add halved yellow onions, chopped celery, chopped carrots, 3 cloves garlic, fresh thyme sprigs, and fresh parsley sprigs.

    How to roast the turkey

    • Place the turkey in the preheated oven for 20 minutes.
    • After 20 minutes, reduce the oven temperature to 325°F/163°C.
    • After hour 2 of cooking, check the turkey and if it has browned to your liking, cover with foil so the turkey does not burn. Turkey roasts an average of 13 minutes per pound. When the internal temperature of the turkey reaches 165°F/74°C the turkey is fully cooked.
    • Once the turkey has reached 165°F, remove the roasting pan from the oven.
      Let the turkey cool for about 10 minutes before removing it from the roasting pan and let it finish cooling on a cutting board for another 15-20 minutes before slicing.

    Notes

    Note 1: Approximately 5 sprigs thyme, 4 sprigs parsley, 6-7 leaves sage, 3-inch rosemary twig, we also had a lot of basil and added some in. Oregano can also be used. If fresh herbs are not available, use dried herbs, although fresh herbs give the ultimate flavor. 
    Note 2: Homemade seasoning salt or a store-bought seasoning salt can be used, about 1 ½ Tablespoons total will work well. 
    Note 3: The giblets can be used to make a gravy. Also great to roast in Make Ahead Turkey Gravy 
     

    Nutrition

    Serving: 1servings | Calories: 747kcal | Carbohydrates: 7g | Protein: 97g | Fat: 36g | Saturated Fat: 11g | Polyunsaturated Fat: 7g | Monounsaturated Fat: 12g | Trans Fat: 1g | Cholesterol: 338mg | Sodium: 1092mg | Potassium: 1119mg | Fiber: 1g | Sugar: 3g | Vitamin A: 2059IU | Vitamin C: 5mg | Calcium: 74mg | Iron: 4mg

    Pecan Pie Muffin Recipe

    November 18, 2024 Leave a Comment

    Pecanpie muffin on a plate.

    These Pecan Pie Muffins are a delicious twist on the classic holiday dessert. Made with buttery pecans and sweet brown sugar these tender muffins make a great breakfast or snack.

    A cupcake pan with pecan pie muffins in the tin.

    For specifics on the recipe use the table of contents to click on sections of the recipe.

    [feast_advanced_jump_to]

    Why you'll love this recipe

    • These muffins can be made ahead so you don't have to worry about spending a lot of time in the kitchen on busy mornings.
    • You also only need simple ingredients so you don't have to worry about spending a lot of money at the grocery store to make them.
    • They are full of all favorite fall flavors without all the effort.

    Ingredient List

    Pecan pie muffin ingredients with text overlay.

    As an Amazon Associate, I earn from qualifying purchases.

    • pecans halves
    • light brown sugar
    •  all-purpose flour 
    •  unsalted butter
    • pure vanilla extract
    • large eggs
    • salt

    Equipment

    • 12 cupcake pan
    • baking sheet
    • cupcake liners
    • Stainless Steel Mixing Bowls
    • Measuring Spoons and Cups
    • Hand Mixer
    • Spatula
    • knife
    • Cutting Board

    Instructions

    This is an overview of the recipe. The full instructions are below in the recipe card.

    Pecans on a baking sheet to make pecan pie muffins.
    1. Preheat the oven to 350°F. Spread the pecans evenly on a baking sheet. Place in the oven and bake for 10 minutes or until slightly darkened. Remove from the oven and chop.
    A silver mixing bowl with eggs being beaten.
    1. While the pecans are baking, add the eggs to a mixing bowl. Beat on low speed with a hand mixer for 1 minute. Add the softened butter to the bowl and continue beating until combined. Scrape down the sides of the bowl if needed.
    A glass bowl with light brown sugar, all-purpose flour, and chopped pecans to make pecan pie muffins.
    1. In a separate mixing bowl, combine the chopped pecans, flour, brown sugar, vanilla extract, and salt. Using a wooden or rubber spatula, mix until well combined.
    An egg mixture with a flour brown sugar mixture and pecans to make pecan pie muffins.
    1. Add the flour mixture to the egg mixture and mix on medium speed until combined. Do not overmix.
    A cupcake pan with pecan pie mixture in the muffin cups.
    1. Scoop the batter into each muffin cup, filling them almost to the top. Sprinkle the remaining pecans on top.
    Cupcake tins with baked pecan pie muffins.
    1. Place the muffin pan in the preheated oven and bake for 15 to 20 minutes, or until the tops are golden brown and the muffins are mostly firm to the touch. Cool for 10 minutes before removing from the pan.
    A muffin tin with pecan pie muffins.

    Eileen's Tips for Success

    • When the pecans are roasting, make sure that you spread them out evenly on the pan, so that they all cook at the same rate.
    • Once you add the flour to the batter, be careful not overmix. Mix until just combined.
    • I like lightly spraying my cupcake liners with nonstick cooking spray to prevent the batter from sticking to the liners.

    Frequently Asked Questions

    What is the secret to moist muffins?

    The secret to getting moist muffins is to not overbake them. Make sure that you watch them closely while they are in the oven.

    Should muffin batter be thick or runny?

    You want this batter to be on the thicker side so that the pecans don't sink to the bottom of the muffins while they are baking.

    Variations

    Do you want to change up this recipe? Here are some ways to change the flavor of this dish.

    • Want to add a little extra flavor? You can add a little cinnamon to give it some warm spice.
    • You can also add a simple vanilla glaze to the top of the muffins for a little extra sweetness.

    Make ahead, storage, and freezer tips

    Storage - Store the muffins in an airtight container at room temperature for up to three days.

    Freezer: You can also freeze them in a freezer-safe container for up to three months. Thaw them on the counter for an hour or two before enjoying.

    Pecan Pie Muffin on a plate topped with chopped pecans.

    Serving Suggestions

    Slow Cooker Pumpkin Hot Chocolate

    Instant Pot Starbucks Zebra Hot Chocolate

    Similar recipes

    Do you love pecan recipes? If so, you may also enjoy these additional recipes.

    • A slice of pie topped with pecans and a drizzle of white cream.
      Whiskey Pecan Pie
    • Two pecan pie cheesecake bars stacked on a white plate.
      Pecan Pie Cheesecake Bars
    • A pecan cheesecake pie with a slice of the cheesecake cut out.
      Pecan Pie Cheesecake Recipe
    • Brown sugar glazed Butter Pecan Sticky Buns in a large baking pan.
      Butter Pecan Sticky Buns Recipe

    I love any comments or questions, please feel free to leave them below.

    Keep up to date with recipes by following me on:

    FACEBOOK  INSTAGRAM, PINTEREST, TWITTER

    Thank you for your continued support. I am forever grateful.

    Eileen  xo

    If you click on the number of servings in the recipe card you can adjust the measurements up or down for the exact number of servings you need.

    📖 Recipe

    Pecanpie muffin on a plate.

    Pecan Pie Muffins

    Enjoy a warm and luscious pecan pie muffin with simple ingredients. A muffin filled with comfort. The flavors we love in pecan pie in a muffin. Great for dessert, snacks, and holidays.
    Print Rate
    Course: Dessert, Snack
    Cuisine: American
    Keyword: pecan pie muffins
    Prep Time: 15 minutes minutes
    Cook Time: 20 minutes minutes
    cooling time: 15 minutes minutes
    Total Time: 50 minutes minutes
    Servings: 12 muffins
    Calories: 277kcal
    Author: Eileen Murphy Kelly

    Equipment

    • 12 cupcake pan
    • baking sheet
    • cupcake liners
    • Stainless Steel Mixing Bowls
    • Measuring Spoons and Cups
    • Hand Mixer
    • Spatula
    • knife
    • Cutting Board

    Ingredients

    • 1 ½ cup pecans halved
    • 2 large eggs
    • ⅔ cup unsalted butter room temperature
    • ½ cup all-purpose flour room temperature
    • 1 cup light brown sugar
    • ½ teaspoon pure vanilla extract
    • ¼ teaspoon salt

    Instructions

    • Preheat the oven to 350°F. Line a muffin pan with muffin cups or generously butter the sides of the pan. Set aside
      Spread 1½ cups pecans evenly on a baking sheet. Place in the oven and bake for 10 minutes or until slightly darkened.
    • Spread 1½ cups pecans evenly on a baking sheet. Place in the oven and bake for 10 minutes or until slightly darkened
    • While the pecans are baking, add 2 large eggs to a large mixing bowl. Beat on low speed with a stand mixer or hand mixer with beaters attached for 1 minute.
    • Add ⅔ cup room temperature unsalted butter to the egg mixture and continue beating until combined. Scrape down the sides of the bowl if needed. Set aside.
    • Remove the pecans from the oven and roughly chop them into small pieces. Set aside ¼ cup for later.
    • In a separate large mixing bowl, combine 1 ¼ cup chopped pecans, ½ cup all-purpose flour, 1 cup light brown sugar, ½ teaspoon vanilla extract, and ¼ teaspoon salt, mix until well combined.
    • Add the flour mixture to the egg mixture. Use a hand mixer with beaters attached, mix on medium speed until just combined. Do not overmix.
    • Line a muffin pan with muffin cups or generously butter the sides of the pan.
    • Scoop the pecan pie muffin batter into 12 muffin cups, filling them almost to the top.
    • Using the set aside pecans, sprinkle on top of each muffin.
    • Place the muffin pan in the preheated oven and bake for 15 to 20 minutes, or until the tops are golden brown and the muffins are mostly firm to the touch.
    • Remove from the oven and let cool for 20 minutes before removing the muffins from the pan. Enjoy.

    Notes

    Be sure to check Expert Tips and FAQs above with important tips and questions that can help make a delicious recipe. 
    Storage - Store the muffins in an airtight container at room temperature for up to three days.
    Freezer: You can also freeze them in a freezer-safe container for up to three months. Thaw them on the counter for an hour or two before enjoying.
     
     
    I'm not a registered dietician, I do my best to provide the most accurate nutritional values. Any nutritional data I provide is an approximation. Actual dietary information can vary based on ingredients and portion sizes. 
    • Don’t forget to shop at the Everyday Eileen store on Amazon.

    Nutrition

    Serving: 1muffin | Calories: 277kcal | Carbohydrates: 24g | Protein: 3g | Fat: 20g | Saturated Fat: 8g | Polyunsaturated Fat: 3g | Monounsaturated Fat: 8g | Trans Fat: 0.4g | Cholesterol: 58mg | Sodium: 67mg | Potassium: 95mg | Fiber: 1g | Sugar: 18g | Vitamin A: 367IU | Vitamin C: 0.1mg | Calcium: 32mg | Iron: 1mg

    Bacon Wrapped Potatoes

    November 16, 2024 Leave a Comment

    Bacon wrapped potato slices with a honey glaze on a plate.

    These Bacon Wrapped Potatoes are the perfect appetizer for any occasion! The tender potatoes are seasoned to perfection and then wrapped in crispy bacon for the ultimate bite.

    A white plate with bacon wrapped potatoes.

    For specifics on the recipe use the table of contents to click on sections of the recipe.

    [feast_advanced_jump_to]

    Why you'll love this recipe

    • These bacon wrapped potato bites make a great appetizer for game day or holiday parties. 
    • These potato wedges wrapped in bacon use simple ingredients that are cost-effective.
    • And, this potato recipe is so easy that even beginner cooks can make it! 

    Bacon-wrapped potatoes are high on our list of great potato recipes. Totchos are another classic. Twice Baked Potatoes are awesome for a side dish.

    Ingredient List

    Ingredients to make bacon wrapped potato slices.

    As an Amazon Associate, I earn from qualifying purchases.

    • olive oil
    • Russet Potatoes
    • ground black pepper
    • Kosher salt
    • garlic powder
    • bacon
    • honey

    Equipment

    • baking sheet
    • Toothpicks
    • Measuring Spoons and Cups
    • Stainless Steel Mixing Bowls

    Instructions

    This is an overview of the recipe. The full instructions are below in the recipe card.

    1. Preheat the oven to 375°F | 180°C. Grease a baking sheet with olive oil.
    A glass bowl with sliced potato wedges.
    1. Season the potatoes with the spices.
    Potato wedges wrapped in bacon on a baking sheet.
    1. Slice the bacon in half. Wrap each potato bite with a bacon strip. Secure with a toothpick and place on the baking sheet. Brush with honey.
    Sliced of potato on a baking sheet wrapped in bacon and baked.
    1. Bake in the preheated oven for 40 minutes or until the potatoes are tender and the bacon is crispy. Garnish with chopped parsley.
    Bacon wrapped potato slices with a honey glaze on a plate.

    Eileen's Tips for Success

    • Try to cut the potatoes into even-sized pieces.
    • For easy clean-up, line the baking tray with aluminum foil or parchment paper.
    • For best results, place potatoes in a single layer on the baking sheet. You don't want to overcrowd them, otherwise, they will be soggy if the pan is overcrowded. 

    Frequently Asked Questions

    ​Do you cook bacon before wrapping?

    No, the bacon will cook as it bakes with the potatoes.

    What is the best way to reheat these potatoes?

    The best way to reheat them is in the air fryer or oven at 350°F until they are warm all the way through. 

    Variations

    Do you want to change up this recipe? Here are some ways to change the flavor of this dish.

    • For this recipe, russet potatoes really work best. However, I've also successfully used baby potatoes or little potatoes that have been sliced in half. 
    • I like to use fresh parsley as a garnish for this delicious appetizer. However, you can also use sour cream, sliced green onions, or even a little cheddar cheese. 
    • Is your family a fan of spicy foods? If so, add a dash of red pepper flakes or cayenne pepper to the seasoning mix for a touch of heat. 

    Make-ahead, storage, and freezer tips

    Storage - Store leftover potatoes in an airtight container in the fridge for up to three days. 

    Bacon wrapped potato appetizers ina. bowl topped with chopped fresh parsley.

    Serving Suggestions

    ​ Air Fryer Pork Chops

     Cheesy Green Beans

    Pineapple Upside Down Cake 

    Serve the potatoes with Blue Cheese Dressing or Everything but the Bagel Dip.

    Similar recipes

    Are you looking for more appetizer recipes to make for your family? If so, give these delicious recipes a try next time: 

    Check all our potato recipes here.

    • Crispy roasted potatoes with fresh seasonings and parsley in a white bowl.
      Crispy Oven Roasted Potatoes Recipe
    • Marshmallow pecan stuffed sweet potatoes.
      Twice Baked Stuffed Sweet Potato
    • An overhead view of homemade mashed potatoes with melting butter on top.
      Homemade Mashed Potatoes Recipe
    • A white table with a large plate of roasted red potatoes on a white and black linen napkin under the plate.
      Garlic Roasted Red Potatoes

    I love any comments or questions, please feel free to leave them below.

    Keep up to date with recipes by following me on:

    FACEBOOK  INSTAGRAM PINTEREST TWITTER

    Thank you for your continued support. I am forever grateful.

    Eileen  xo

    If you click on the number of servings in the recipe card you can adjust the measurements up or down for the exact number of servings you need.

    📖 Recipe

    Bacon wrapped potato slices with a honey glaze on a plate.

    Bacon Wrapped Potato Recipe

    Tender and roasted potato bites wrapped with bacon. Crispy, sweet and juicy, this recipe can be served as an appetizer or a side dish.
    Print Pin Rate
    Course: Appetizer
    Cuisine: American
    Keyword: bacon wrapped potatoes, smoky bacon wrapped potatoes
    Prep Time: 10 minutes minutes
    Cook Time: 40 minutes minutes
    0 minutes minutes
    Total Time: 50 minutes minutes
    Servings: 6 servings
    Calories: 346kcal
    Author: Eileen Murphy Kelly

    Equipment

    • baking sheet
    • Toothpicks
    • Measuring Spoons and Cups
    • Stainless Steel Mixing Bowls

    Ingredients

    • 1 teaspoon olive oil Note 1
    • 4 large Russet Potatoes (cut into 2-inch pieces) (1.65 lb | 750 g)
    • 1 teaspoon black pepper
    • 1 teaspoon Kosher salt
    • 1 teaspoon garlic powder
    • 8-10 strips bacon Note 2
    • 2 Tablespoons honey
    • chopped fresh parsley optional garnish

    Instructions

    • Preheat the oven to 375°F|180°C. Grease a baking sheet with 1 teaspoon olive oil .
    • In a large mixing bowl, season 4 large Russet Potatoes (cut into 2-inch pieces) with 1 teaspoon black pepper, 1 teaspoon Kosher salt, and 1 teaspoon garlic powder.
    • Slice 8-10 strips bacon in half. Wrap each potato slice with a bacon strip. Secure with a toothpick and place on the baking sheet. Brush with 2 Tablespoons honey.
    • Bake in the preheated oven for 40 minutes until the potatoes are tender and the bacon nicely crisped.
    • Remove and arrange on a plate. Garnish with chopped fresh parsley
    • Serve with your favorite dip. Enjoy!

    Notes

    Be sure to check Expert Tips and FAQs above with important tips and questions that can help make a delicious recipe. 
    Note 1: We use olive oil, any favorite oil can be used such as avocado oil. Another alternative is to use non-stick baking spray for the baking sheet.
    Note 2: The bacon should be uncooked when wrapping the potatoes. 
    Leftovers: Store in the refrigerator in an airtight container for up to 5 days.
    Freezer:  Allow to cool down and freeze in an airtight container for 1 month.
    How to reheat: Reheat in the microwave until heated through.
    I'm not a registered dietician, I do my best to provide the most accurate nutritional values. Any nutritional data I provide is an approximation. Actual dietary information can vary based on ingredients and portion sizes. 
    • Don’t forget to shop at the Everyday Eileen store on Amazon.


    Nutrition

    Serving: 6slices | Calories: 346kcal | Carbohydrates: 51g | Protein: 9g | Fat: 13g | Saturated Fat: 4g | Polyunsaturated Fat: 2g | Monounsaturated Fat: 6g | Trans Fat: 0.04g | Cholesterol: 19mg | Sodium: 595mg | Potassium: 1098mg | Fiber: 3g | Sugar: 7g | Vitamin A: 15IU | Vitamin C: 14mg | Calcium: 36mg | Iron: 2mg

    Twice Baked Stuffed Sweet Potato

    November 14, 2024 Leave a Comment

    Marshmallow pecan stuffed sweet potatoes.

    These Stuffed Baked Sweet Potatoes with Marshmallows are the perfect side dish for any holiday meal or special occasion. The combination of sweet potato, buttery pecans, and gooey marshmallows make them a crowd favorite.

    Baked sweet potatoes stuffed with butter pecans and topped with marshmallows.

    For specifics on the recipe use the table of contents to click on sections of the recipe.

    [feast_advanced_jump_to]

    Why you'll love this recipe

    • These twice baked sweet potatoes are a family favorite.
    • Stuffed pecan marshmallow sweet potatoes can be made ahead of time.
    • The crunchy pecans and gooey marshmallows give them the same flavor as everyone's favorite sweet potato casserole.
    • Pecan marshmallow stuffed sweet potatoes are a great way to feed a crowd this holiday season.

    Ingredient List

    Sweet Potato ingredients with text overlay for stuffed sweet potatoes with pecans and marshmallows.

    As an Amazon Associate, I earn from qualifying purchases.

    • large sweet potatoes
    • salted butter
    • light brown sugar
    • chopped pecans
    • ground cinnamon
    • mini marshmallows

    Equipment

    • baking sheet
    • aluminum foil
    • Cutting Board
    • knife
    • Measuring Spoons and Cups

    Instructions

    This is an overview of the recipe. The full instructions are below in the recipe card.

    1. Preheat the oven to 400°F/200°C. Line a baking sheet with aluminum foil.
    Sweet potatoes on a baking sheet ready to be baked.
    1. Scrub the sweet potatoes. Pierce them with a fork. Then place on top of the baking sheet. Bake for 45 minutes.
    A bowl of softened butter, brown sugar, and pecans to stuff into sweet potatoes.
    1. While the potatoes are cooking, mix butter, brown sugar, chopped pecans, and cinnamon until combined.
    Sliced open baked sweet potatoes on a baking sheet.
    1. Cut each sweet potato in the center.
    A baking sheet lined with aluminum foil with baked potatoes sliced open.
    1. Use a fork to mash the inside of the potatoes slightly.
    Baked sweet potatoes stuffed with a butter pecan filling.
    1. Add some of the butter and pecan mixture into the potatoes and top with marshmallows.
    Baked stuffed sweet potatoes with a pecan butter filling topped with marshmallows.
    1. Broil for 15 to 20 minutes or until the marshmallows are slightly browned.
    A baked sweet potato with brown sugar, pecans, and mini marshmallows.

    Eileen's Tips for Success

    • I like to scrub the potatoes with a vegetable brush to ensure all dirt is removed from the potato skin.
    • Make sure that you poke holes all over the sweet potatoes so that they steam evenly,
    • If you want to save a little time in the kitchen, you can roast the potatoes ahead of time and store them in the refrigerator. Reheat them in the oven before adding the fillings.

    Frequently Asked Questions

    Do you have to peel sweet potatoes before baking?

    No, for this recipe you do not want to peel the potatoes before you bake them.

    Should you poke holes in sweet potatoes before baking?

    Yes, the holes allow the potatoes to steam which helps the inside of the potatoes turn out nice and fluffy.

    Variations

    Do you want to change up this recipe? Here are some ways to change the flavor of this dish.

    • Want to add some extra flavor? Swap out the cinnamon and use the pumpkin pie spice instead.
    • You can also use walnuts instead of pecans if you prefer them.

    Make ahead, storage, and freezer tips

    Storage - Store the leftover potatoes in an airtight container in the fridge for up to 3 days.

    A baking tray with sweet potatoes stuffed with marshmallows and a pecan butter.

    Serving Suggestions

    We love to serve these stuffed sweet potatoes with our holiday meal. My go-to holiday favorites are this Easy Oven Roasted Turkey, Southern Cornbread Dressing, and Candied Carrots.

    Similar recipes

    Do you love potatoes as much as we do? If so, here are a few more potato recipes you may enjoy.

    • Marshmallow topped sweet potatoes on a black platter.
      Classic Marshmallow Sweet Potato Casserole Recipe
    • Easy Cheesy Scalloped Potatoes garnished with fresh rosemary on a white plate
      Easy Cheesy Scalloped Potatoes
    • butternut squash sweet potato soup
      Butternut Squash and Sweet Potato Soup
    • An overhead view of homemade mashed potatoes with melting butter on top.
      Homemade Mashed Potatoes Recipe

    I love any comments or questions, please feel free to leave them below.

    Keep up to date with recipes by following me on:

    FACEBOOK  INSTAGRAM, PINTEREST, TWITTER

    Thank you for your continued support. I am forever grateful.

    Eileen  xo

    If you click on the number of servings in the recipe card you can adjust the measurements for the exact number of servings you need.

    📖 Recipe

    Stuffed sweet potatoes with pecans, butter, brown sugar, and marshmallows.

    Twice Baked Stuffed Sweet Potatoes

    Enjoy this decadent sweet potato stuffed with buttery brown sugar pecan filling topped with mini marshmallows. We take the classic sweet potato casserole and make individual sweet potato servings.
    Print Rate
    Course: Holiday Side dish, Side Dish
    Cuisine: American
    Keyword: marshmallow stuffed sweet potatoes, stuffed sweet potatoes
    Prep Time: 15 minutes minutes
    Cook Time: 45 minutes minutes
    0 minutes minutes
    Total Time: 1 hour hour
    Servings: 4 stuffed sweet potatoes
    Calories: 580kcal
    Author: Eileen Murphy Kelly

    Equipment

    • baking sheet
    • aluminum foil
    • Cutting Board
    • knife
    • Measuring Spoons and Cups

    Ingredients

    • 4 large sweet potatoes
    • 4 Tablespoons salted butter room temperature softened
    • ¼ cup light brown sugar
    • ½ cup chopped pecans
    • 1 teaspoon ground cinnamon
    • 1 cup mini marshmallows

    Instructions

    • Preheat the oven to 400°F/200°C. Line a baking sheet with aluminum foil.
    • Clean the 4 sweet potatoes and pierce them on all sides with a fork to allow steam to escape. Place the sweet potatoes on the baking sheet.
    • Bake for 45 minutes or until the sweet potatoes are tender throughout.
    • To make the butter mixture, combine 4 Tablespoons softened salted butter, ¼ cup light brown sugar, ½ cup chopped pecans, and 1 teaspoon ground cinnamon in a small mixing bowl. Use a fork to mix well.
    • Cut each sweet potato down the middle. Use a fork to mash the inside slightly.
    • Evenly spread the butter mixture into each sweet potato. Top with ¼ cup of mini marshmallows.
    • Place the sweet potatoes in the oven on broil for 15 to 20 seconds, just until the marshmallows are browned. Be careful not to burn them!

    Notes

     
    Be sure to check Expert Tips and FAQs above with important tips and questions that can help make a delicious recipe. 


    I'm not a registered dietician, I do my best to provide the most accurate nutritional values. Any nutritional data I provide is an approximation. Actual dietary information can vary based on ingredients and portion sizes. 
    • Don’t forget to shop at the Everyday Eileen store on Amazon.
     

    Nutrition

    Serving: 1stuffed sweet potato | Calories: 580kcal | Carbohydrates: 94g | Protein: 7g | Fat: 21g | Saturated Fat: 8g | Polyunsaturated Fat: 3g | Monounsaturated Fat: 9g | Trans Fat: 0.5g | Cholesterol: 30mg | Sodium: 291mg | Potassium: 1226mg | Fiber: 12g | Sugar: 35g | Vitamin A: 48595IU | Vitamin C: 8mg | Calcium: 132mg | Iron: 3mg

    Creamy Chicken Gnocchi Soup

    November 6, 2024 Leave a Comment

    Chicken gnocchi soup

    This Creamy Chicken Gnocchi Soup is the perfect comforting dish for a chilly evening. Made with tender chicken, pillowy gnocchi, and hearty vegetables in a creamy broth. This soup is sure to warm you up from the inside out.

    Creamy Chicken Gnocchi Spip in a red dutch oven with spinach and carrots.

    For specifics on the recipe use the table of contents to click on sections of the recipe.

    [feast_advanced_jump_to]

    Why you'll love this recipe

    • The tender gnocchi and creamy broth make this soup the ultimate comfort food on a winter night.
    • You only need simple ingredients so this soup is budget-friendly so you don't have to worry about a large grocery bill.
    • This creamy chicken gnocchi soup recipe is easy enough for busy weeknights but gourmet style for guests.
    • If you frequent Olive Garden, this soup is better than the chicken gnocchi soup on their menu.

    Ingredient List

    Ingredients to make creamy Chicken Gnocchi Soup.

    As an Amazon Associate, I earn from qualifying purchases.

    • unsalted butter
    • shredded carrots
    • yellow onion
    • diced celery
    • fresh garlic cloves
    • all-purpose flour
    • half and half
    • cooked chicken breast
    • low-sodium chicken broth
    • potato gnocchi
    •  salt
    • ground black pepper
    • ground nutmeg
    • fresh thyme
    • baby spinach
    • fresh thyme 

    Equipment

    • Dutch Oven
    • Measuring Spoons and Cups
    • Cutting Board
    • knife

    Instructions

    This is an overview of the recipe. The full instructions are below in the recipe card.

    A Dutch oven with onions, celery, and carrots for the base of chicken gnocchi soup.
    1. In a large Dutch oven melt the butter, add carrots, celery, and onion. Cook for five minutes. Add the garlic and cook until vegetables are tender.
    A Dutch oven with heavy cream added to vegetables for the base of chicken gnocchi soup.
    1. Add flour (gluten-free use cornstarch) to the vegetables. Then add the half and half and simmer for 3 minutes or until thickened.
    Creamy chicken gnocchi soup with fresh cooked sliced chicken in the dutch oven.
    1. Add the cooked chicken and chicken broth, bring to a boil.
    A large dutch oven with gnocchi, chicken, cream, and thyme to make a creamy chicken gnocchi soup.
    1. Add the seasoning and gnocchi and cook until the gnocchi is done.
    A Dutch oven with creamy chicken soup with gnocchi and spinach.
    1. Stir in the spinach and cook for 2 minutes.
    A Dutch oven with creamy soup filled with chicken gnocchi soup.
    1. Serve with fresh thyme. (optional garnish)
    Creamy chicken gnocchi soup in a red Dutch oven.

    To start with raw chicken:

    If you prefer to start the recipe with 1 pound of uncooked boneless, skinless chicken breasts, sliced into 1 ½-inch strips instead of using cooked chicken, here are the instructions:

    Before step 1: Season 1 pound of chicken with ½ teaspoon each of salt, black pepper, and garlic powder. Add 1 Tablespoon of olive oil to the Dutch oven, allow the oil to warm.

    Add the seasoned chicken to the Dutch oven. Saute until browned through, about 5-7 minutes. Remove from the pan, set aside. Proceed with the recipe.

    Variations

    Do you want to change up this recipe? Here are some ways to change the flavor of this dish.

    • Additional ingredients: Add fresh herbs such as rosemary, basil, or parsley.
    • Spice: Add a pinch of cayenne pepper or crushed red pepper flakes.
    • Chicken: If you prefer to cook the chicken from scratch, we include the instructions in the recipe card.
    • Gluten-free: Substitute 2 Tablespoons cornstarch for the all-purpose flour.
    • Dairy-free: use either vegan butter or dairy-free buttery spread. Use dairy-free whipped cream, I use Califa.
    • Salt: A salt substitute such as Mrs. Dash can be used instead of salt.

    Eileen's Tips for Success

    • Once you add the garlic to the vegetable mixture, don't overcook them. Garlic is very easy to burn.
    • Allow the flour to brown for a minute or two before adding the cream. This will cook off the raw flour taste.
    • Gnocchi cooks very quickly. Be sure to monitor the time of cooking the gnocchi in the soup.

    Frequently Asked Questions

    Should I cook gnocchi before adding it to the soup?

    No, the gnocchi will be cooked inside the soup.

    How to thicken potato gnocchi soup?

    The all-purpose flour that is added to the vegetables will thicken the soup. If you prefer a thicker soup, add more flour slurry to get the desired thickness.

    Make ahead, storage, and freezer tips

    Storage - Store leftovers in an airtight container in the refrigerator for up to 3 days.

    Freezer: I do not recommend freezing chicken Gnocchi Soup as it is made with dairy which does not freeze well.

    Note: The gnocchi expands and soaks up the soup the longer it sits in the refrigerator.

    A Dutch oven with chicken gnocchi soup.

    Serving Suggestions

    This creamy chicken gnocchi soup is delicious when served on its own as a meal, however, we like to pair it with a simple bread side like this Instant Pot French Bread or these Easy Yeast Rolls. Don't forget a sweet treat like these Apple Cider Cupcakes.

    Similar recipes

    Are you looking for more soup recipes that will be great on a chilly day? If so, add one of these recipes to your meal plan.

    Check out all our soup recipes here.

    • Creamy Mushroom Barley Soup Recipe
    • A bowl of broccoli beer cheese soup with shredded cheese.
      Broccoli Beer Cheese Soup
    • Zuppa Toscana Soup made in the Instant Pot or stovetop.
      Instant Pot Zuppa Toscana Soup
    • Hearty carrot coconut soup in a white soup bowl topped with pepitas and chopped herbs
      Carrot Coconut Soup

    I love any comments or questions, please feel free to leave them below.

    Keep up to date with recipes by following me on:

    FACEBOOK  INSTAGRAM, PINTEREST, TWITTER

    Thank you for your continued support. I am forever grateful.

    Eileen  xo

    If you click on the number of servings in the recipe card you can adjust the measurements up or down for the exact number of servings you need.

    📖 Recipe

    Creamy chicken gnocchi soup with spinach and shredded carrots in a bowl.

    Creamy Chicken and Gnocchi Soup

    Creamy Chicken Gnocchi Soup is a simple and delicious homemade soup is a must-make for all. A popular pasta restaurant makes a chicken gnocchi soup and this recipe is much better and easy to make at home with simple ingredients.
    Print Pin Rate
    Course: Main Course
    Cuisine: American
    Keyword: chicken gnocchi soup, copycat olive garden chicken gnocchi soup, creamy chicken gnocchi soup
    Prep Time: 5 minutes minutes
    Cook Time: 30 minutes minutes
    0 minutes minutes
    Total Time: 35 minutes minutes
    Servings: 6 servings
    Calories: 428kcal
    Author: Eileen Murphy Kelly

    Equipment

    • Dutch Oven
    • Measuring Spoons and Cups
    • Cutting Board
    • knife

    Ingredients

    • 4 Tablespoons unsalted butter Note 1: Dairy-free: 4 Tablespoons dairy free butter sticks.
    • 1 cup shredded carrots
    • 1 cup diced celery
    • 1 medium diced yellow onion
    • 3 cloves minced garlic
    • ¼ cup all-purpose flour gluten-free 2 Tablespoons cornstarch
    • 2 ¼ cups half and half Note 1
    • 1 ½ cups cooked chicken breast chopped
    • 3 cups low-sodium chicken broth Note 2
    • 16 ounce potato gnocchi
    • 1 teaspoon salt Note 3
    • ½ teaspoon black pepper
    • ¼ teaspoon ground nutmeg
    • 2 sprigs fresh thyme
    • 2 cups baby spinach chopped
    • fresh thyme optional garnish

    Instructions

    • Melt 4 Tablespoons unsalted butterdairy-free option in notes) in a large Dutch oven over medium heat.
    • Add 1 cup shredded carrots, 1 cup diced celery , and 1 medium diced yellow onion to the Dutch oven, sauté for 5 minutes. Add 3 cloves minced garlic and continue cooking until the onions are translucent and the vegetables are tender.
    • Stir ¼ cup all-purpose flour (gluten-free use 2 Tablespoons cornstarch) into the vegetables and cook for 2 more minutes.
    • Gradually pour in 2 ¼ cups half and half. (dairy-free option, note 1) while stirring to prevent clumping. Bring the mixture to a simmer and cook for 3 minutes or until thickened.
    • Add 1 ½ cups cooked chicken breast and 3 cups low-sodium chicken broth Note 2 to the Dutch oven. Bring the mixture to a boil.
    • Stir in 16 ounce potato gnocchi, 1 teaspoon salt, ½ teaspoon black pepper, ¼ teaspoon ground nutmeg, and 2 sprigs fresh thyme Simmer for 5 minutes or until the gnocchi is cooked through.
    • Stir in 2 cups baby spinach and cook until wilted about 2 minutes.
    • Taste the soup for seasoning, if needed adjust any seasoning.
    • Serve the soup. Top with fresh thyme , optional garnish.

    Notes

    Be sure to check Expert Tips and FAQs above with important tips and questions that can help make a delicious recipe. 
    To start with raw chicken:
    If you prefer to start the recipe with 1 pound of uncooked boneless, skinless chicken breasts, sliced into 1 ½ inch strips instead of using cooked chicken, here are the instructions:
    Before step 1: Season 1 pound of chicken with ½ teaspoon each of salt, black pepper, and garlic powder. Add 1 Tablespoon of olive oil to the Dutch oven, heat up the oil.
    Add the seasoned chicken to the Dutch oven. Saute until browned through, about 5-7 minutes. Remove from the pan, set aside. Proceed with the recipe.
    Note 1: Dairy-free - Use 4 Tablespoons Vegan butter sticks or 4 Tablespoons dairy-free butter spread.  For the heavy cream, use diary-free heavy whipped such as Califa or Silk brand.
    Note 2: Regular chicken stock or homemade chicken stock can be used. We use low sodium to keep sodium levels down. 
    Note 3: If sodium free is preferred use a salt substitute like Mrs. Dash. 
    I'm not a registered dietician, I do my best to provide the most accurate nutritional values. Any nutritional data I provide is an approximation. Actual dietary information can vary based on ingredients and portion sizes. 
    • Don’t forget to shop at the Everyday Eileen store on Amazon.
     

    Nutrition

    Serving: 1serving | Calories: 428kcal | Carbohydrates: 41g | Protein: 21g | Fat: 21g | Saturated Fat: 12g | Polyunsaturated Fat: 1g | Monounsaturated Fat: 6g | Trans Fat: 0.3g | Cholesterol: 82mg | Sodium: 799mg | Potassium: 524mg | Fiber: 3g | Sugar: 6g | Vitamin A: 5156IU | Vitamin C: 8mg | Calcium: 158mg | Iron: 4mg

    No-Churn Pumpkin Spice Ice Cream

    October 29, 2024 Leave a Comment

    A loaf pan with pumpkin ice cream with a Biscoff cookie crumble.

    This No-Churn Pumpkin Spice Ice Cream is the perfect fall treat! Made with real pumpkin puree, warm spices, and a creamy base, it's easy to make and sure to become a family favorite. And, you don't even need an ice cream machine to make it! 

    A loaf pan of no-Churn Pumpkin Ice Cream topped with crushed Biscoff ice cream.

    For specifics on the recipe use the table of contents to click on sections of the recipe.

    [feast_advanced_jump_to]

    Why you'll love this recipe

    • This recipe is so easy to make, and since it's a no-churn recipe, you won't even need an ice cream maker.
    • You need simple ingredients to make pumpkin ice cream, no spending extra money at the grocery store.
    • This recipe is easy enough for beginners can make it.
    • Try a scoop of this ice cream on top of your favorite holiday pie recipe. 

    Ingredient List

    5 ingredient no churn ice cream with text overlay.

    As an Amazon Associate, I earn from qualifying purchases.

    • heavy cream
    • sweetened condensed milk
    • pumpkin pie spice
    • pumpkin puree 
    • Biscoff cookies

    Equipment

    • Loaf Pan
    • Hand Mixer
    • Measuring Spoons and Cups
    • can opener
    • Whisk
    • Wooden Spoon

    Instructions

    This is an overview of the recipe. The full instructions are below in the recipe card.

    A glass bowl with whipped cream to make pumpkin ice cream.
    1. In a large mixing bowl, whip heavy cream until stiff peaks form.
    A glass bowl with whipped cream and pumpkin puree to make no churn pumpkin ice cream.
    1. Whisk in the sweetened condensed milk, pumpkin pie spice, and pumpkin puree until combined. Gently fold into the whipped cream.
    A bowl of pumpkin ice cream ingredients topped with Biscoff cookies.
    1. Set aside three tablespoons of the crushed cookies. Fold the remaining cookies into the pumpkin whipped cream.
    A loaf pan with ingredients to make No-Churn Pumpkin Ice Cream.
    1. Spread the mixture into a loaf pan. Sprinkle the top with the remaining crushed cookies. Freeze for 8 hours or until hardened.
    A loaf pan with pumpkin ice cream topped with Biscoff cookies.

    Eileen's Tips for Success

    • To easily whip cream, place the bowl in the freezer for about 30 minutes so it's cold. This will help the stiff peaks form faster. 
    • While you can mix the ice cream base by hand, an electric mixer will help you save a lot of time and arm cramps. 
    • You must use heavy whipping cream, not whipping cream otherwise your base will not fully set up. 
    A bowl of pumpkin no churn ice cream with Biscoff cookie crumbles.

    Frequently Asked Questions

    How does no-churn ice cream work?

    This recipe works because the whipped cream firms up in the freezer tp give a nice and firm ice cream full of pumpkin pie flavor. 

    Why is my no-churn ice cream not freezing?

    ​If your ice cream is not firming up, that typically means that you didn't whip the creamy ice cream base enough.
    Ensure that you get firm peaks before you add the remaining ingredients. 

    Variations

    Do you want to change up this recipe? Here are some ways to change the flavor of this dish.

    • Crunch: Try using different types of cookies. Crushed gingersnaps, graham crackers, or even Oreo cookies all work great in this ice cream. 
    • Flavor: Add a splash of vanilla extract or almond extract. 

    Make ahead, storage, and freezer tips

    Storage - Homemade pumpkin pie ice cream can be kept in the freezer for up to three months.

    Wrap the loaf pan tightly with plastic wrap to keep the ice cream fresh.

    A freezer-safe covered pan will keep the ice cream fresh for three months.

    Pumpkin ice cream with crushed biscoff cookies in the ice cream.

    Serving Suggestions

    ​This no-churn pumpkin pie ice cream recipe is great when you pair it with your favorite fall meal.

    We like to serve it after a hearty dinner like this Instant Pot Beef Bourguignon with an easy recipe like this Instant Pot French Bread for dipping.

    Similar recipes

    ​Do you love making homemade ice cream? If so, you may want to give these ice cream recipes a try next time. 

    Check out all our ice cream recipes here.

    • Cheesecake ice cream, no churn on a wire rack.
      No Churn Cheesecake Ice Cream
    • A scoop of caramel ice cream being scopped out of a bowl.
      Salted Caramel Ice Cream Recipe
    • No-churn cookie monster ice cream in a loaf pan.
      Homemade Cookie Monster Ice Cream
    • No churn grasshopper ice cream in a bowl with mint leaves on the side.
      Homemade Grasshopper Ice Cream

    I love any comments or questions, please feel free to leave them below.

    Keep up to date with recipes by following me on:

    FACEBOOK  INSTAGRAM, PINTEREST, TWITTER

    Thank you for your continued support. I am forever grateful.

    Eileen  xo

    If you click on the number of servings in the recipe card you can adjust the measurements up or down for the exact number of servings you need.

    📖 Recipe

    A loaf pan with pumpkin ice cream with a Biscoff cookie crumble.

    Pumpkin Pie Ice Cream

    Easy No-Churn Pumpkin Ice Cream made with 5 simple ingredients is a refreshing ice cream dessert. A perfect and refreshing ice cream.
    Print Rate
    Course: Dessert, Snack
    Cuisine: American
    Keyword: no churn pumpkin ice cream, pumpkin ice cream
    Prep Time: 15 minutes minutes
    Cook Time: 0 minutes minutes
    freezer time: 8 hours hours
    Total Time: 8 hours hours 15 minutes minutes
    Servings: 8 servings
    Calories: 469kcal
    Author: Eileen Murphy Kelly

    Equipment

    • Loaf Pan
    • Hand Mixer
    • Measuring Spoons and Cups
    • can opener
    • Whisk
    • Wooden Spoon

    Ingredients

    • 1 ½ cups heavy cream
    • 14 ounce can, sweetened condensed milk
    • 1 ½ teaspoons pumpkin pie spice
    • ⅔ cup pumpkin puree canned or home made
    • 25 Biscoff cookies crushed but not fine split, note 1

    Instructions

    • In a large mixing bowl, use a hand mixer with beaters attached and add 1 ½ cups heavy cream. Begin on low speed and increase to high to whip until stiff peaks form.
    • Whisk until combined, 14 ounce can, sweetened condensed milk, 1 ½ teaspoons pumpkin pie spice, and ⅔ cup pumpkin puree together, about 1 minute. Add this mixture to the whipped cream and fold together until smooth.
    • Fold in the crushed Biscoff cookies, leave out about 2 to 3 Tablespoons of the crushed cookies to top the ice cream mixture.
    • Pour the ice cream mixture into the loaf pan and top with the 2-3 Tablespoons of extra Biscoff cookie pieces.
    • Freeze for at least 8 hours or overnight.
    • Scoop with an ice cream scoop to serve and enjoy.

    Notes

    Be sure to check Expert Tips and FAQs above with important tips and questions that can help make a delicious recipe. 
    Note 1: When crushing the Biscoff cookies, use most of the crushed cookies in the ice cream mixture. 
    Storage - Homemade pumpkin pie ice cream can be kept in the freezer for up to three months.
    Wrap the loaf pan tightly with plastic wrap to keep the ice cream fresh.
    A freezer-safe covered pan will keep the ice cream fresh for three months.
    I'm not a registered dietician, I do my best to provide the most accurate nutritional values. Any nutritional data I provide is an approximation. Actual dietary information can vary based on ingredients and portion sizes. 
    • Don’t forget to shop at the Everyday Eileen store on Amazon.

    Nutrition

    Serving: 1serving | Calories: 469kcal | Carbohydrates: 52g | Protein: 7g | Fat: 26g | Saturated Fat: 14g | Polyunsaturated Fat: 3g | Monounsaturated Fat: 6g | Cholesterol: 57mg | Sodium: 173mg | Potassium: 114mg | Fiber: 1g | Sugar: 37g | Vitamin A: 3985IU | Vitamin C: 1mg | Calcium: 165mg | Iron: 1mg

    Easy Pumpkin Tiramisu Cups

    October 22, 2024 Leave a Comment

    Pumpkin tiramisu in individual cocette ceramic bowls.

    Pumpkin Tiramisu Cups are a luscious dessert with a creamy pumpkin mousse. Our tiramisu is full of creamy mascarpone cheese filling made in individual serving portions.

    White small ceramic holders with pumpkin tiramisu in the bowls.

    For specifics on the recipe use the table of contents to click on sections of the recipe.

    [feast_advanced_jump_to]

    Why you'll love this recipe

    • It is a fun and festive dessert that is easy and so elegant.
    • Easy preparation, make the tiramisu ahead of time.

    Ingredient List

    Pumpkin tiramisu ingredients with text overlay.

    As an Amazon Associate, I earn from qualifying purchases.

    Mascarpone Cream

    • heavy cream: do not use low-fat or half-and-half. The heavy cream will make this so creamy.
    • mascarpone cheese: adds a velvety texture to the cream.
    • pumpkin puree
    • pumpkin pie spice
    • vanilla extract

    Pumpkin Whipped Cream

    • heavy cream
    • pure maple syrup
    • pumpkin pie spice 
    •  light brown sugar

    Equipment

    • Stainless Steel Mixing Bowls
    • Sifter
    • Staub Mini Cocotte 3 piece
    • Hand Mixer
    • Spatula

    Instructions

    This is an overview of the recipe. The full instructions are below in the recipe card.

    How to make Mascarpone Cream

    A glass bowl with an orange cream in the bowl.
    1. Combine the ingredients for the mascarpone. In a large mixing bowl (or the bowl of a stand mixer ), combine all ingredients. Using a hand mixer, beat on low speed and gradually work up to medium speed (if you go straight to medium speed, you’ll have a mess to clean up).
    2. Beat on medium speed until the pumpkin and mascarpone are fully combined and the mixture is light and fluffy about 3 minutes.

    How to make Pumpkin Whipped Cream

    A glass bowl with whipped mousse in the bowl.
    1. In a large bowl (or the bowl of a stand mixer) add the pumpkin whipped cream ingredients. Use a hand mixer or stand mixer to beat ingredients together
    2. Step 2: Beat at medium speed the whipped cream can hold a stiff peak— about 3 minutes. Set aside.

    Assemble Pumpkin Tiramisu

    Two small ramekins and a bowl of dark liquid and lady fingers on a white table.
    1. In a small mixing bowl combine espresso and spiced rum to make a coffee mixture.
    Lady fingers split in half in the bottom of a white ramekin and a bowl of espresso next to the ramekins.
    1. Dip a ladyfinger into the coffee mixture and place it in the bottom of a ramekin. Repeat the steps using as many ladyfingers as needed to cover the ramekin bottom. The ladyfingers can be broken in half.
    Two cocotte bowls with creamy pumpkin whip cream on top.
    1. Cover the ladyfingers with some pumpkin mousse. Smooth the top to ensure an even layer.
    Two cocotte bowls with creamy pumpkin whip cream on top.
    1. Cover the pumpkin mousse with pumpkin whipped cream. Smooth the top again to ensure an even layer.
    Pumpkin tiramisu in small cocottes with pumpkin mascarpone. The tiramisu is topped with cocoa powder.
    1. Add the cocoa powder and pumpkin pie spice to a sifter. Sprinkle over the top of the tiramisu in an even layer.
    2. Optional garnish, chocolate shavings can be added to the top layer.
    3. Refrigerate for at least 2 hours before serving.
    Individual servings of pumpkin tiramisu on a platter.

    Make ahead, storage, and freezer tips

    Storage - This is a great make-ahead recipe that can be prepared the evening before eating. Wrap carefully in plastic wrap.

    Tip: Spray the plastic wrap with non-stick baking spray to help prevent it from sticking to the whipped cream and cocoa.

    Leftovers can be stored, covered with plastic wrap, or in an airtight container for about 2 days.

    Freezer: We do not recommend freezing tiramisu. The cream and ladyfingers are not freezer-friendly. The cream can break when defrosting, becoming watery. Ladyfingers will get mushy when defrosted.

    Eileen's Tips for Success

    • This is a splurge dessert, for the best results, use heavy cream, no substitutes, please.

    Frequently Asked Questions

    What is the origin of tiramisu?

    A traditional tiramisu is a classic Italian dessert. The dessert usually has a few layers of ladyfinger, espresso or strong coffee, Marsala wine, and a mascarpone cream mixture.
    We have taken the recipe and made a tasty twist by using pumpkin puree for a delicious recipe.

    Variations

    Do you want to change up this recipe? Here are some ways to change the flavor of this dish.

    • Alcohol: Feel free to use only espresso. A bit of apple cider or a non-alcohol pumpkin cider would be delicious options.
    • Spiced Rum: Amaretto
    • Marscapone Cheese: While Marscapone cream is my first choice, cream cheese cheese is a tasty substitute.
    • Lady Fingers: Spongecakes or biscotti would both be great substitutes.
    Serving size of pumpkin tiramisu.

    Serving Suggestions

    Irish Coffee

    Pumpkin Spice Latte

    Similar recipes

    Pumpkin Cupcakes

    Pumpkin Muffins

    Pumpkin Cinnamon Rolls

    Pumpkin Pecan Pie Bars

    • breakfast sliders on Hawaiian pretzel buns.
      Breakfast Sliders on Pretzel Buns
    • A plate of ravioli caprese with fresh ravioli, sauteéd spinach and tomatoes with mozzarella.
      Caprese Ravioli Recipe
    • Easy beanie weenies made with hot dogs and baked beans.
      The Best Beanie Weenies Recipe
    • A bowl of pasta fagiole with a crusty piece of bread
      Pasta e Fagioli Soup (Pasta Fazool)

    I love any comments or questions, please feel free to leave them below.

    Keep up to date with recipes by following me on:

    FACEBOOK  INSTAGRAM, PINTEREST, TWITTER

    Thank you for your continued support. I am forever grateful.

    Eileen  xo

    📖 Recipe

    Pumpkin tiramisu in individual cocette ceramic bowls.

    Easy Pumpkin Tiramisu Cups

    Enjoy easy Pumpkin Tiramisu made in individual cups for easy serving. A decadent pumpkin mousse topped with a maple pumpkin whipped cream is an eye-pleasing and tasty dessert.
    Print Rate
    Course: Dessert
    Cuisine: American
    Keyword: easy pumpkin dessert, individual pumpkin tiramisu, pumpkin tiramisu
    Prep Time: 20 minutes minutes
    Cook Time: 0 minutes minutes
    refrigeration time: 2 hours hours
    Total Time: 2 hours hours 20 minutes minutes
    Servings: 6 servings
    Calories: 451kcal
    Author: Eileen Murphy Kelly

    Equipment

    • Stainless Steel Mixing Bowls
    • Sifter
    • Staub Mini Cocotte 3 piece any ramekin will work for the tiramisu.
    • Hand Mixer
    • Spatula

    Ingredients

    Mascarpone Cream

    • ⅔ cup heavy cream Note 1
    • 4 ounces Mascarpone cheese Note 2
    • 1 teaspoon pure vanilla extract
    • ½ cup pumpkin puree homemade or canned
    • 1 teaspoon pumpkin pie spice homemade or store-bought

    Pumpkin Whipped Cream

    • 1 cup heavy cream please use heavy cream and do not substitute
    • ¼ cup pure maple syrup Use pure maple syrup
    • 1 teaspoon pumpkin pie spice homemade or store-bought
    • 2 Tablespoons light brown sugar

    Ladyfinger Layer

    • ½ cup espresso or strong brewed coffee
    • 2 Tablespoons spiced rum
    • 8 ladyfinger cookies

    Toppings

    • ¼ cup unsweetened cocoa powder
    • ½ teaspoon pumpkin pie spice homemade or store-bought

    Instructions

    Mascarpone Cream Filling

    • In the bowl of a stand mixer with whisk attachment or a large mixing bowl using an electric hand mixer with beaters attached, combine ⅔ cups heavy cream, 4 ounces Mascarpone cheese, 1 teaspoon vanilla extract, ½ cup pumpkin puree, and 1 teaspoon pumpkin pie spice.
    • Beat on low speed and increase speed to medium speed until the pumpkin and mascarpone cheese are fully combined and the mixture is light and fluffy about 3 minutes. Set aside.

    Whipped Cream

    • In the bowl of a stand mixer with the whisk attachment or a large mixing bowl using an electric hand mixer with beaters, combine 1 cup heavy cream, ¼ cup pure maple syrup, 1 teaspoon pumpkin pie spice, and 2 teaspoons light brown sugar. Beat on low speed and gradually work up to medium speed until the whipped cream holds stiff peaks, about 3 minutes. Set aside.

    Assemble the Tiramisu

    • To make an espresso dipping mixture for the lady fingers, in a small mixing bowl, combine ½ cup espresso and 2 Tablespoons spiced rum.
    • Dip a ladyfinger into the espresso dipping mixture. Then place it into the bottom of a ramekin. Repeat with as many ladyfingers as it takes to cover the bottom of the ramekin completely. If needed, break the ladyfingers in half to fit into the ramekins.
    • Next, cover the ladyfingers with a portion of pumpkin mousse. Smooth the top to ensure an even layer.
    • Then, cover the pumpkin mousse with pumpkin whipped cream. Smooth the top again to ensure an even layer.
    • Repeat with the remaining 6 ramekins: ladyfingers, pumpkin mousse, whipped cream, ladyfingers, pumpkin mousse, whipped cream.
    • Add the cocoa powder and pumpkin pie spice to a sifter and sift it over the top of each tiramisu cup, in an even layer.
    • Refrigerate for at least 2 hours before serving.

    Notes

    Be sure to check Expert Tips and FAQs above with important tips and questions that can help make a delicious recipe. 
    This recipe makes 6 individual pumpkin tiramisu. If you prefer 1 large dessert, this will make a 6 layer pumpkin tiramisu. 
    Note 1: Heavy cream must be used in this recipe. Do not substitute lower-fat milk product because the cream will not form correctly. 
    Note 2: If you don’t have mascarpone, cream cheese is a great substitute.
    Note 3: When choosing maple syrup, look for one that says Grade A. Try to avoid anything that says “maple-flavored syrup”.
    Note 4: If you don’t have spiced rum, try Amaretto liquor— or leave it out entirely.
    I'm not a registered dietician, I do my best to provide the most accurate nutritional values. Any nutritional data I provide is an approximation. Actual dietary information can vary based on ingredients and portion sizes. 
    • Don’t forget to shop at the Everyday Eileen store on Amazon.

    Nutrition

    Serving: 1serving | Calories: 451kcal | Carbohydrates: 29g | Protein: 5g | Fat: 35g | Saturated Fat: 21g | Polyunsaturated Fat: 1g | Monounsaturated Fat: 8g | Cholesterol: 142mg | Sodium: 64mg | Potassium: 228mg | Fiber: 2g | Sugar: 13g | Vitamin A: 4498IU | Vitamin C: 1mg | Calcium: 110mg | Iron: 2mg

    Instant Pot Beef Bourguignon

    October 13, 2024 Leave a Comment

    A bowl of instant pot beef Bourguignon recipe.

    This Instant Pot Beef Bourguignon Recipe has all of the traditional flavors of the classic dish but with an easy twist. With tender chunks of beef, vegetables, and a rich sauce infused with red wine, this dish will become a family favorite.

    Instant Pot Beef Bourguignon in a bowl with potatoes and carrots.

    For specifics on the recipe use the table of contents to click on sections of the recipe.

    [feast_advanced_jump_to]

    Why you'll love this recipe

    • You only need simple ingredients to help make Instant Pot Beef Bourguignon. A comfort food meal so you don't have to worry about spending extra money at the grocery store.
    • Beef Bourguignon is warm and hearty so it's a great filling meal that your family will love.
    • Instant Pot Beef Bourguignon is a simple recipe for beginners to make for guests.

    Ingredient List

    Instant pot Beef Bourguignon ingredients with text overlay.

    As an Amazon Associate, I earn from qualifying purchases.

    • beef chuck roast
    • salt
    • black pepper
    • bacon
    • olive oil
    • yellow onion
    • fresh garlic cloves
    • carrots
    • baby potatoes
    • dry red wine
    • tomato paste
    • beef broth
    • Worcestershire sauce
    • dried thyme
    • bay leaf
    • unsalted butter
    • white mushrooms
    • all-purpose flour 
    • fresh parsley

    Equipment

    • 6 quart Instant Pot
    • Measuring Spoons and Cups
    • Cutting Board
    • knife
    • Wooden Spoon
    • Saute Pan, 5 quart

    Instructions

    This is an overview of the recipe. The full instructions are below in the recipe card.

    1. Season the chuck beef with salt and pepper.
    An Instant pot with bacon being browned.
    1. With your pot on saute mode cook the bacon until crispy. Then remove and set aside.
    An Instant Pot with beef being seared for beef Bourguignon.
    1. In the same pot sear the beef on all sides. Remove the beef and set it aside.
    Instant pot with diced onions being sauteed.
    1. Add the olive oil to the pot, and then saute the onions until tender. Add the garlic and cook for another minute.
    Wine being poured into an Instant Pot vessel for Instant pot beef Bourguignon.
    1. Pour in the wine and scrape the bottom well to remove all the brown bites from the bottom.
    An instant pot with red wine and potatoes to make Instant pot beef Bourguignon.
    1. Add all the remaining ingredients but the mushrooms to the pot, and pressure cook on high pressure for 35 minutes. Natural release for 10 minutes.
    Sauteed mushrooms in a bowl to be added to beef  Bourguignon..
    1. Meanwhile, saute the mushrooms in butter until browned.
    An Instant Pot with a measuring cup with Bourguignon sauce and flour to make a thicker sauce.
    1. Once the release time is up, remove the list, and about a cup of broth and add the cornstarch to the broth.
    An instant pot vessel with mushrooms and beef in a Bourguignon sauce.
    1. Add the mushrooms and cornstarch slurry and allow it to thicken. Serve warm.
    A bowl of Beef Bourguignon in front of an Instant Pot.

    Eileen's Tips for Success

    • You will need to sear the beef in batches so you don't overcrowd the pressure cooker. You want the beef to brown on all sides.
    • If you are using large carrots cut them into evenly sized pieces so that they cook evenly.
    • Don't skip the natural release time, this will allow your meat to stay tender.

    Frequently Asked Questions

    What's the difference between beef stew and beef bourguignon?

    The main difference between the two is that beef bourguignon is made with wine whereas beef stew is made with water.

    Why is my beef tough in Instant Pot?

    If your beef is tough, the meat may have been cut too large or you did not cook the meat long enough.
    Or, the pressure was released too early and didn't allow the natural release.

    Variations

    Do you want to change up this recipe? Here are some ways to change the flavor of this dish.

    • Wine: We use a dry red wine such as Pinot Noir, Burgundy, or Merlot. I do recommend that you use a good quality wine for the best flavor.
    • Vegetables: Feel free to add more vegetables to the instant pot such as parsnips, turnips, or green beans.
    • Spice: For a bit of spice, add a pinch or two of crushed red pepper flakes when you add the remaining ingredients.

    Make ahead, storage, and freezer tips

    Storage - Store leftovers in an airtight container in the refrigerator for up to three days.

    A bowl of a beef bourguignon made in the instant pot.

    Serving Suggestions

    Pressure cooker beef bourguignon is a great meal on its own.

    However, I like to serve it with a simple bread side dish like Instant Pot French Bread.

    You can also serve it with a sweet treat like Homemade Lemon Bundt Cake.

    Similar recipes

    Are you looking for more Instant Pot recipes to make for your family? These are a few of my favorite recipes.

    Enjoy all our Instant Pot recipes here.

    • Asian sticky wings in the Instant pot with a homemade sauce.
      Asian Style Instant Pot Spare Rib
    • A white platter with a golden brown roast chicken on the platter with roasted carrots, purple carrots and potatoes around the chicken.
      Roast Chicken in the Instant Pot
    • A stack of Philly cheesesteak sliders on a plate.
      Instant Pot Philly Cheesesteak
    • A white bowl of spaghetti with taco seasoning and a fork in the center of the bowl.
      Instant Pot Taco Spaghetti

    I love any comments or questions, please feel free to leave them below.

    Keep up to date with recipes by following me on:

    FACEBOOK  INSTAGRAM, PINTEREST, TWITTER

    Thank you for your continued support. I am forever grateful.

    Eileen  xo

    If you click on the number of servings in the recipe card you can adjust the measurements up or down for the exact number of servings you need.

    📖 Recipe

    A bowl of instant pot beef Bourguignon recipe.

    Instant Pot Beef Bourguignon Recipe

    This Instant Pot Beef Bourguignon offers a quick yet flavorful take on the classic French dish, combining tender beef, crisp bacon, and a rich red wine sauce with carrots, potatoes, and mushrooms. It's an ideal recipe for a comforting meal that can be prepared in just over an hour.
    Print Pin Rate
    Course: Main Course
    Cuisine: French
    Keyword: instant pot beef bourguignon, pressure cooker beef bourguignon
    Prep Time: 20 minutes minutes
    Cook Time: 1 hour hour 10 minutes minutes
    0 minutes minutes
    Total Time: 1 hour hour 30 minutes minutes
    Servings: 6 servings
    Calories: 557kcal
    Author: Eileen Murphy Kelly

    Equipment

    • 6 quart Instant Pot
    • Measuring Spoons and Cups
    • Cutting Board
    • knife
    • Wooden Spoon
    • Saute Pan, 5 quart

    Ingredients

    Seasoning the beef chuck

    • 2 pounds beef chuck roast cut into ½-inch cubes
    • ½ teaspoon salt
    • ½ teaspoon black pepper

    Beef Bourguignon Recipe

    • 4 slices diced bacon
    • 2 Tablespoons olive oil
    • 1 large diced yellow onion
    • 3 cloves minced garlic
    • 2 cups baby carrots or 3 large carrots cut into 1-inch pieces
    • 1 pound baby potatoes, halved
    • ½ teaspoon salt
    • ½ teaspoon black pepper
    • 2 cups dry red wine 480 ml
    • 2 Tablespoons tomato paste
    • 2 cups beef broth 480 ml
    • 1 Tablespoon Worcestershire sauce
    • 1 teaspoon ground thyme
    • 1 bay leaf
    • 1 Tablespoon unsalted butter
    • 8 ounces white mushrooms sliced
    • 2 Tablespoons all-purpose flour (optional, for thickening)
    • 1 Tablespoon chopped fresh parsley chopped, optional garnish

    Instructions

    Seasoning the beef chuck

    • Season 2 pounds beef chuck roast with ½ teaspoon salt and ½ teaspoon black pepper. Set aside.

    Making the Beef Bourguignon

    • Turn the Instant Pot to the sauté setting. Add 4 slices diced bacon and cook until crispy. Remove the bacon and set it aside.
    • In the same pot, sear the seasoned beef cubes in batches until browned on all sides. Remove the beef and set it aside with the bacon.
    • To the vessel of the Instant Pot, if needed, add 2 Tablespoons olive oil to the pot, add and sauté 1 large diced yellow onion for about 3 minutes to soften the onion.
    • Stir in 3 cloves minced garlic, 2 cups baby carrots (cut in 1-inch pieces), and 1 pound baby potatoes, halved season with ½ teaspoon saltand ½ teaspoon black pepper saute for about 1 minute.
    • To the Instant Pot cooking vessel, add 2 cups dry red wine to deglaze the pot. Use a wooden spoon to scrape up any browned bits from the bottom. Let the wine simmer for 2-3 minutes.
    • Add 2 Tablespoons tomato paste2 cups beef broth1 Tablespoon Worcestershire sauce, 1 teaspoon ground thyme and 1 bay leaf. Add back to the pot, the browned beef and cooked bacon.
    • Secure the lid on the Instant Pot and set it to the "Pressure Cook" or "Manual" setting on high pressure for 35 minutes. Once done, allow a natural release for 10 minutes, then perform a quick release for any remaining pressure.
    • While the beef is cooking, heat 1 Tablespoon unsalted butter in a medium-sized pan, add 8 ounces white mushrooms to the pan, and saute until browned. Set aside.
    • If you prefer a thicker sauce, remove about ¼ cup of cooking liquid and whisk in 2 Tablespoons all-purpose flour. Stir this mixture back into the pot and set the Instant Pot to sauté, cooking for another 5 minutes until the sauce thickens.
    • Stir in the sautéed mushrooms. Taste the sauce for seasoning, if needed, adjust seasonings with additional salt and pepper. Serve hot. If desired, garnished with 1 Tablespoon chopped fresh parsley.

    Notes

    Be sure to check Variations, Expert Tips, and FAQs above with important tips and questions that can help make a delicious recipe.
     
    Cook Time: 1 hour 10 minutes (including pressure build-up and release)
    Any nutritional data I provide is an approximation and actual dietary information can vary based on ingredients and proportion sizes.
     
    Don’t forget to shop at the Everyday Eileen store on Amazon

    Nutrition

    Serving: 1serving | Calories: 557kcal | Carbohydrates: 27g | Protein: 36g | Fat: 28g | Saturated Fat: 10g | Polyunsaturated Fat: 3g | Monounsaturated Fat: 15g | Trans Fat: 1g | Cholesterol: 114mg | Sodium: 874mg | Potassium: 1359mg | Fiber: 4g | Sugar: 5g | Vitamin A: 6004IU | Vitamin C: 21mg | Calcium: 69mg | Iron: 5mg

    Cajun Lemon Butter Baked Tilapia

    October 10, 2024 2 Comments

    Tilapia baked in a cajun lemon butter with lime and topped with fresh parsley.

    Cajun Lemon Butter Baked Tilapia is a quick and easy recipe that is perfect for busy weeknights. The tilapia fillets are baked to perfection with a delicious Cajun seasoning blend. The results are perfect, tender, and flaky fillets in a luscious lemon butter sauce. A fabulous 30-minute dinner.

    Baked tilapia in a cajun lemon butter sauce in a baking dish.

    For specifics on the recipe use the table of contents to click on sections of the recipe.

    [feast_advanced_jump_to]

    Why you'll love this recipe

    • Our baked Cajun tilapia recipe uses easy, affordable ingredients.
    • Cajun lemon butter baked tilapia is a great recipe for any level of home cook.
    • Our baked tilapia recipe is ready in under 30 minutes, so it's perfect for busy weeknights.

    Ingredient List

    Baked Tilapia ingredients with text overlay.

    As an Amazon Associate, I earn from qualifying purchases.

    • unsalted butter 
    • tilapia fillets
    • kosher salt
    • cracked black pepper
    • homemade Cajun seasoning
    • crushed red pepper flakes
    • fresh parsley
    • fresh garlic cloves
    • large lemons
    • fresh parsley 

    Equipment

    • 9x13 inch casserole dish
    • Measuring Spoons and Cups
    • Stainless Steel Mixing Bowls
    • knife
    • Cutting Board

    Instructions

    This is an overview of the recipe. The full instructions are below in the recipe card.

    1. Preheat the oven to 400°F/ 200°C. Rub the baking dish with unsalted butter.
    A baking dish with tilapia fillets in the pan.
    1. Add the tilapia fillets to the prepared baking dish.
    A bowl with unsalted butter with cajun seasoning and spices for a butter sauce for tilapia.
    1. Then in a small bowl mix together the kosher salt, cracked black pepper, cajun seasoning, crushed red pepper flakes, chopped parsley, minced garlic, and unsalted butter until combined.
    Tilapia fillets to be baked in a baking dish topped with a cajun lemon butter.
    1. Spread the seasoned butter over top of the fillets. Squeeze fresh lemon juice on top.
    Baked lemon butter sauce over tilapia fillets.
    1. Bake in preheated oven for about 10 minutes or until the fish is flaky and fork-tender.
    Baked tilapia with lemon and cajun spices over rice.

    Eileen's Tips for Success

    • You can use parchment paper in your baking dish instead of greasing it for easy cleanup.
    • I like to leave the lemon wedges in the baking dish while the fish cooks for even more flavor.
    • I like to serve these cajun tilapia fillets over a bed of rice.
    • The size of your fillets will affect your cooking times, so make sure to use a meat thermometer to check them for doneness.
    • If using frozen fish, be sure to defrost the fish in the refrigerator before proceeding with the recipe.

    Frequently Asked Questions

    What temperature should tilapia be cooked at?

    You want to ensure that your tilapia reaches an internal temperature of 145 degrees.

    Should fish be covered or uncovered when baking in the oven?

    You don't want the fish to steam, so it's best to bake it uncovered. Covering it would cause it to cook too slowly.

    Do you have to flip fish when baking?

    No, there is no need to flip the lemon butter tilapia fillets while they are cooking.

    Variations

    Do you want to change up this recipe? Here are some ways to change the flavor of this dish.

    • Out of cajun seasoning? You can use Old Bay Seasoning or any favorite Cajun seasoning in this recipe.
    • Lime juice is another great citrus juice to use on baked tilapia.
    • Fish: This recipe will work on just about any fish especially flaky fish like flounder, dorado, halibut, cod, and seabass.

    Make-ahead, storage, and freezer tips

    Storage - Store leftover baked tilapia fish filets in an airtight container in the refrigerator for up to 2 days.

    A baking dish with tilapia fillets in a lemon butter sauce with cajun spices.

    Serving Suggestions

    Instant Pot Rice

    Garlic Roasted Red Potatoes

    Roasted Green Beans

    Grilled Asparagus

    Check out all our side dishes here.

    Similar recipes

    Do you enjoy seafood recipes? If so, next time check out these tasty recipes.

    Enjoy all our seafood and fish recipes here.

    • Grilled salmon topped with lemon and herbs, wrapped in foil and grilled.
      Foil Wrapped Salmon with Lemon and Herbs
    • sheet pan balsamic glazed salmon potatoes and Brus
      Sheet Pan Balsamic Salmon, Brussels Sprouts,and Potatoes
    • A red dinner plate topped with scallops pasta with a brown butter.
      Brown Butter Scallop Pasta Recipe
    • Panko Crusted fish sticks on a white plate with an air fryer in the background.
      Homemade Air Fryer Fish Sticks

    I love any comments or questions, please feel free to leave them below.

    Keep up to date with recipes by following me on:

    FACEBOOK  INSTAGRAM PINTEREST TWITTER

    Thank you for your continued support. I am forever grateful.

    Eileen  xo

    If you click on the number of servings in the recipe card you can adjust the measurements up or down for the exact number of servings you need.

    📖 Recipe

    Tilapia baked in a cajun lemon butter with lime and topped with fresh parsley.

    Lemon Butter Cajun Baked Tilapia

    Cajun Baked Tilapia is quick and easy for any weeknight dinner. The tilapia is baked in a lemony, garlic and butter sauce to get a rich fish dish to serve within 30 minutes
    5 from 1 vote
    Print Pin Rate
    Course: Main Course
    Cuisine: American
    Keyword: baked tilapia, cajun fish fillet, fish in butter sauce
    Prep Time: 5 minutes minutes
    Cook Time: 10 minutes minutes
    0 minutes minutes
    Total Time: 15 minutes minutes
    Servings: 4 servings
    Calories: 160kcal
    Author: Eileen Murphy Kelly

    Equipment

    • 9x13 inch casserole dish
    • Measuring Spoons and Cups
    • Stainless Steel Mixing Bowls
    • knife
    • Cutting Board

    Ingredients

    • ½ teaspoon unsalted butter for baking tray Note 1

    Preparing the Tilapia

    • 4 (6 ) ounce tilapia fillets (2.5 lb | 1 kg) Note 2
    • ½ teaspoon kosher salt
    • ½ teaspoon cracked black pepper
    • 1 teaspoon homemade Cajun seasoning or store bought
    • 1 teaspoon crushed red pepper flakes
    • 1 Tablespoon fresh parsley, chopped
    • 3 cloves garlic, peeled and minced
    • 4 Tablespoons unsalted butter, room temperature
    • 2 large lemons

    Garnishes

    • 1 Tablespoon fresh parsley, chopped optional garnish
    • 1 large lemon, sliced thin optional garnish

    Instructions

    • Preheat the oven to 400°F/ 200°C. Rub a 9 x13 inch baking dish with ½ teaspoon unsalted butter or non-stick baking spray.
    • Place 4 (6 ) ounce tilapia fillets in the prepared baking dish.
    • In a small mixing bowl, combine ½ teaspoon kosher salt, ½ teaspoon cracked black pepper, 1 teaspoon homemade Cajun seasoning, 1 teaspoon crushed red pepper flakes, 1 Tablespoon fresh parsley, chopped, 3 cloves garlic, peeled and minced, and 4 Tablespoons unsalted butter, room temperature. Spread the mixture equally on each fish.
    • Slice 2 large lemons in half and squeeze each half over the seasoned tilapias.
    • Bake in the preheated oven for about 10 minutes. The fish will be flaky and fork tender.
    • Ready to serve. Optional garnish, serve tilapia fillets with 1 Tablespoon fresh parsley, chopped, and 1 large lemon, sliced thin.

    Notes

    Be sure to check Variations, Expert Tips, and FAQs above with important tips and questions that can help make a delicious recipe.
    Note 1: Use either ½ Tablespoon unsalted butter or non-stick baking spray on the baking pan.
    Note 2: We use tilapia filetts that weight about .5 to .6 ounces each. If using frozen tilapia fillets, defrost them in the refrigerator overnight before using in the recipe. 
    Storage: Store in the refrigerator in an airtight container for up to 3 days.
    Freezer Instructions:  Allow to cool down and freeze in an airtight container for 1 month.
    Reheat: Reheat in the microwave until heated through.
     
    Any nutritional data I provide is an approximation and actual dietary information can vary based on ingredients and proportion sizes.
    Don’t forget to shop at the Everyday Eileen store on Amazon

    Nutrition

    Serving: 1fillet | Calories: 160kcal | Carbohydrates: 7g | Protein: 8g | Fat: 13g | Saturated Fat: 8g | Polyunsaturated Fat: 1g | Monounsaturated Fat: 3g | Trans Fat: 0.5g | Cholesterol: 48mg | Sodium: 320mg | Potassium: 220mg | Fiber: 2g | Sugar: 1g | Vitamin A: 859IU | Vitamin C: 31mg | Calcium: 32mg | Iron: 1mg
    • « Go to Previous Page
    • Page 1
    • Interim pages omitted …
    • Page 6
    • Page 7
    • Page 8
    • Page 9
    • Page 10
    • Interim pages omitted …
    • Page 78
    • Go to Next Page »

    Primary Sidebar

    Footer

    ↑ back to top

    About

    • Privacy Policy
    • Shop with me
    • Accessibility

    Newsletter

    • Sign Up! for emails and updates

    Contact

    • Contact

    As an Amazon Associate, I earn from qualifying purchases.

    Copyright © 2026 Everyday Eileen, Eileen Murphy Kelly